Blogging is one of the best B2B strategies for driving traffic, increasing authority, and building trust with your audience.
And learning how to write a blog that ranks is easier than ever, thanks to the growing popularity of AI tools.
But writing a good blog post with AI requires more than just spinning up a few paragraphs in ChatGPT and hitting publish.
Readers can tell when a post has been generated by a machine rather than crafted by a real person. The disconnect damages trust and reduces engagement with your site. It makes your blog feel less relevant and helpful.
For a blog to perform well, AI alone isn’t enough. It needs real human touch, insight, and purpose.
In this article, we’ll walk you through how to write a blog post using AI for SEO (Search Engine Optimization).
We’ll share the exact process we use to write posts that get our clients ranking on the first page of Google.
By the end of this article, you’ll be an expert on which tools to use, how to do quality keyword research, how to make an AI blog sound human, and more.
Follow these steps to create optimized blog posts with AI that rank high on search engines like Google.
We independently review everything we recommend. When you buy through our links, we may earn a commission.
Getting Ready: Prepare Your Tools
Below are the SEO tools we use to write blog posts with AI.
You only need to prepare your tools once. Once you’ve signed up and created accounts, you’ll use them to write all subsequent blogs.
We recommend using all of them for the best results.
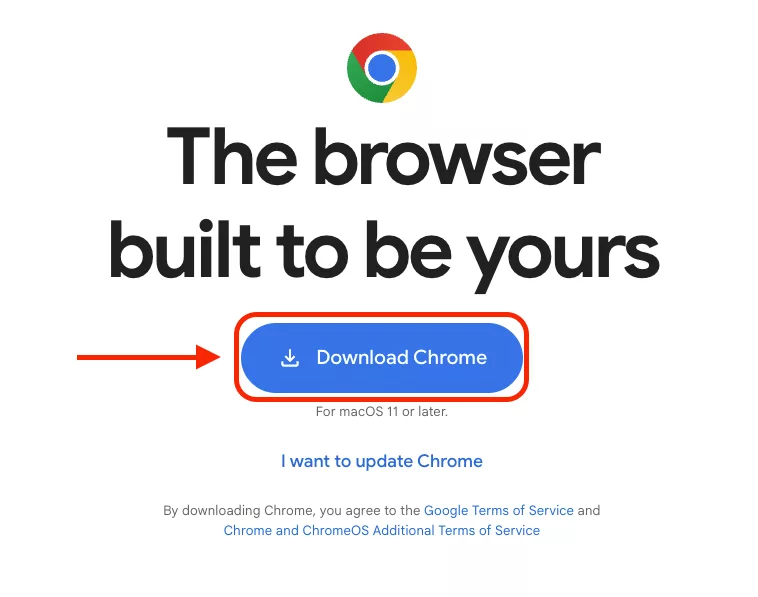
Google Chrome
Chrome is ideal for most SEO writing purposes because it supports helpful browser extensions that speed up your keyword research.
To get started, visit google.com/chrome and click Download Chrome.
Install the application on your device, follow the prompts, and you’ll be set in just a few minutes.
If you’d prefer to not use Chrome, Brave Browser is a good alternative that has all the same extensions.
The Detailed SEO Chrome Extension
Once you’ve installed Google Chrome, the next step is to add the Detailed SEO Extension.
This is one of our favorite free tools for content marketing research. It gives you instant access to on-page SEO insights for any webpage.
We use it to analyze blog posts from competitors, check meta tags, and extract headings quickly.
To download it:
- Open Chrome
- Visit the Detailed SEO Extension page.
- Click Add to Chrome
- Click Add Extension when prompted.
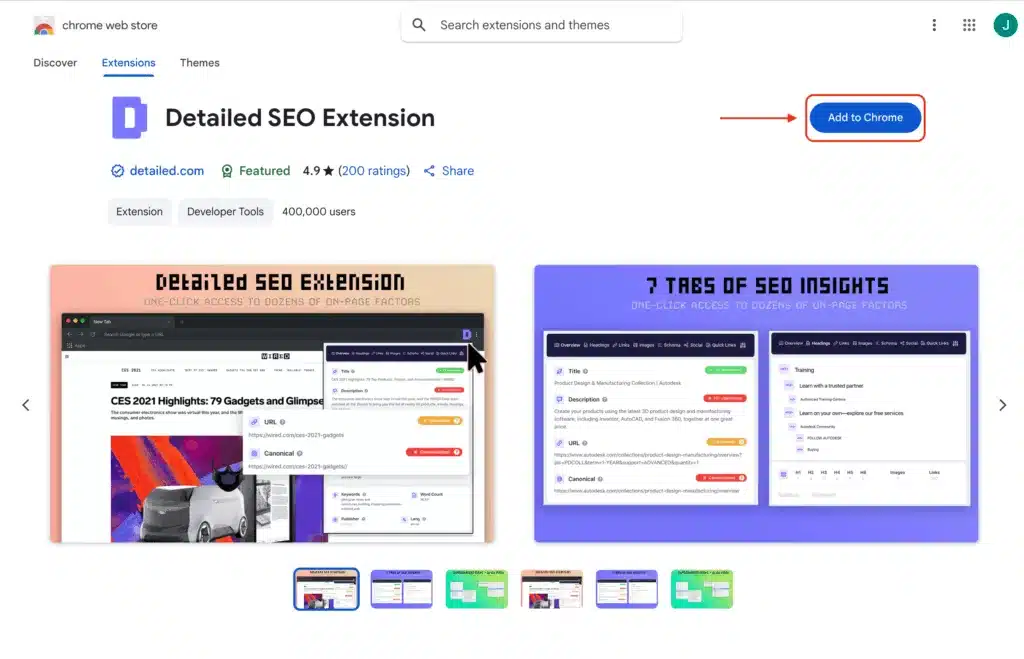
After it installs:
- Click the puzzle piece icon next to the URL bar
- Find Detailed SEO
- Pin it by clicking the small pushpin icon.
This makes it easy to access while reviewing individual posts or finding keyword ideas for your next blog.
Google Keyword Planner
A good blog post starts with finding the right keywords, and the Google Keyword Planner is the ideal tool for this. With the Keyword Planner, you’re looking at real search data, straight from Google.
It lets you see how often users search for specific terms and how much competition you’re up against if you choose to target them.
You can access it by creating a free Google Ads account.
Once you have an account, click Tools > Planning > Keyword Planner in the menu on the left of your account overview page.

ClearBrand Writing Resources
Next, click here to download ClearBrand’s writing resources for free.
These resources include scripts, prompts, and templates that make researching and publishing blog posts significantly faster.
After downloading, create a new folder in Google Drive and upload:
- A fresh copy of the Research Template
- A fresh copy of the Blog Template
- A fresh copy of the writing checklist
This is the easiest way to avoid compatibility issues and make sure you can use the included scripts.
ChatGPT
ChatGPT is one of the most powerful tools you can use to speed up the blog writing process.
It’s excellent for getting your first draft written, helping you brainstorm keyword ideas, or polishing rough sections.
But it’s still just a tool, and it works best when paired with your own insight and expertise.
You’ll use ChatGPT to structure content, generate initial drafts, and iterate on revisions. But avoid treating its output as final. You’ll still need to provide a human touch to get the best results.
Here’s why:
- ChatGPT still lacks depth: Even the newest models can produce content that feels shallow or overly generalized. If your readers are looking for detailed information or nuanced guidance, generic AI output won’t be good enough.
- Fact-checking is a must: AI models are known to “hallucinate,” meaning they sometimes generate information that sounds true…but isn’t. If you rely on ChatGPT without verifying key points, you risk damaging your credibility and your authority in search engine rankings.
- Your expertise matters most: If you lean too hard on ChatGPT, you lose the human angle that makes a great post worth reading.

How to Set Up ChatGPT for Blog Writing
To get the most out of ChatGPT, we recommend buying a paid subscription and creating a dedicated project within the platform.
This gives you access to custom instructions and newer models like GPT-4.5, which offer better writing capabilities than the free version.
If that’s not an option, just use the free version.
Here’s how to get started:
- Visit chat.openai.com and create an account.
- Recommended: Upgrade to the Plus plan (you’ll need this for access to the latest models and projects with custom instructions).
- Create a new project inside the left-hand menu panel.
- Add custom instructions that explain your writing style, goals, and brand voice. We recommend using these instructions as a baseline to get started: I will tell you I want to write and optimize a blog for a certain keyword. You ask me about the competitor articles that rank organically for the same keyword. I will provide the URL, title tag, meta description, and outline of headings for each of the top-5 ranking blog posts. You look at the information provided for the top 5 performing posts and determine what my article would need to include to rank for the same keyword. To do this, look at the outlines from each of the blogs. Compare them. Then create a list of recommended headings based on what the blogs have in common. Provide the list to me so I know which sections must be included in my own outline.
These are the exact prompts we use to write engaging blog content that ranks for our clients – but they’re not all of the instructions we use.
Click below to download the ONLY guide you need to write human-sounding blog content that actually ranks. You’ll gain access to:
- A full list of customizable project instructions you can use to capture your brand’s voice
- A research template that helps you analyze rankings 4X faster
- A blog template with custom scripts that slash publishing time by 50%
- A complete writing checklist that covers all SEO best practices
This is a complete system for writing blogs with AI, click-by-click…and IT’S FREE!
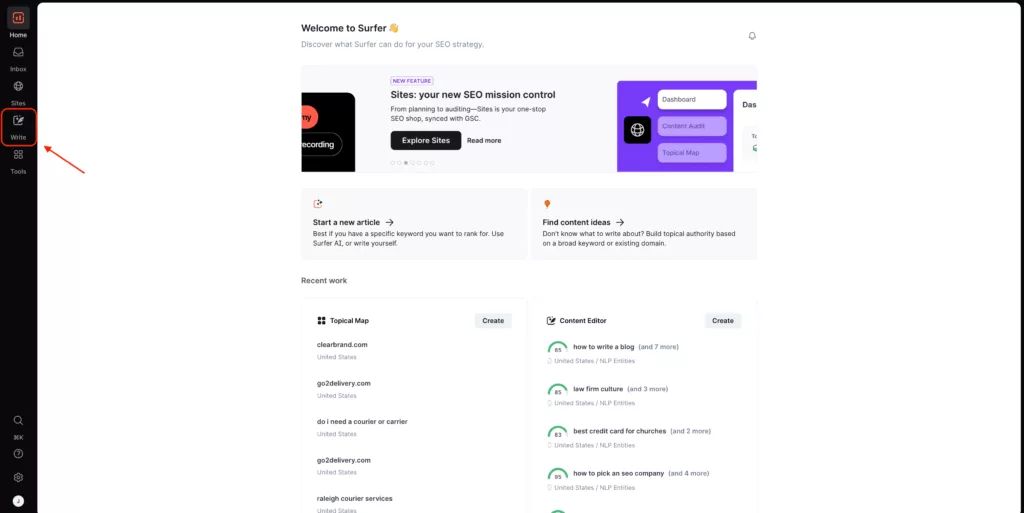
SurferSEO
Surfer SEO takes SEO content writing to the next level.
It’s a data-driven tool that automates a huge portion of the keyword research people usually perform by hand.
Surfer scans the top-ranking content on search engines. Then it shows you what keywords and themes to cover in your own post.
Click here to start a subscription with Surfer.
Once you’re set up, you can write your first blog post using Surfer’s content editor. It’s a workspace that guides SEO writing based on what’s already ranking.
For example, if you’re writing about “how to write a blog for SEO,” Surfer will scan the pages and articles that are already ranking on the first page, then show you headlines, topics, and keywords they have in common.

Now that we have all the tools set up, let’s write your article.
Step 1: Brainstorm Topics & Find Keywords
Now, it’s time to come up with ideas for blog topics. Use the process below to take notes that you can use to find potential writing topics.
Consider Your Audience
Before you write your blog post, get a clear understanding of who you’re writing for. Your target audience shapes how detailed your content should be and which keywords make sense to target.
If you’re writing for beginners, keep things simple and avoid jargon. If your readers are more advanced, go deeper with examples and specific terms.
Also consider search intent, which is why someone might be looking for the topic you’re covering in the first place.
Most blog posts fall into two categories of search intent:
- Informational intent: The reader wants to learn something. These keywords work great for blogs that teach, explain, or walk through a process.
- Transactional intent: The reader is closer to making a purchase or hiring a service. These are usually better for landing pages, but you can still target them in blog posts that build trust before a customer decides to buy from you.
When you find keywords for your post, choose ones that align with your audience’s intent and where they are in their journey. This is one of the best ways to write blog posts that get found, read, and shared.
Once you’ve given your audience some thought, complete the Audience tab of your spreadsheet.
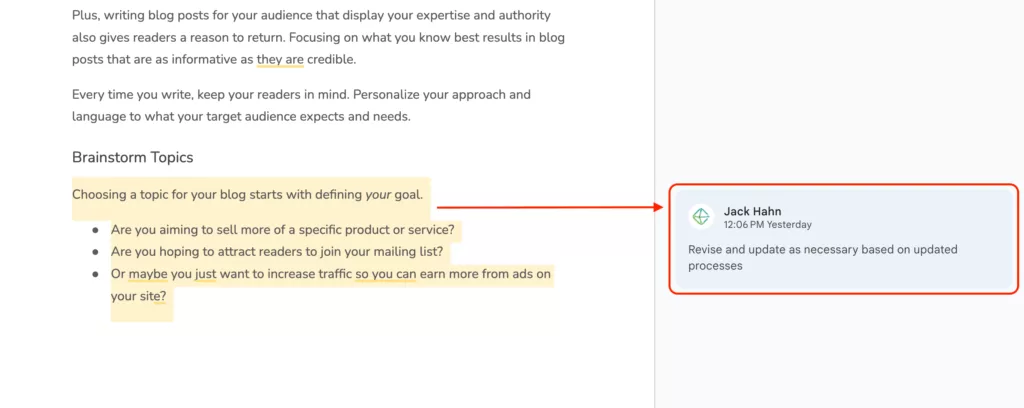
Brainstorm Topics
Choosing a topic for your blog starts with defining your goal.
- Are you aiming to sell more of a specific product or service?
- Are you hoping to attract readers to join your mailing list?
- Or maybe you just want to increase traffic so you can earn more from ads on your site?
What you want to achieve will help you decide what to write in different types of blog posts.
- If you want to sell more of a product or service, write a blog post that shows you’re the expert on what you want to sell.
- If your goal is to grow your email list, write about topics that align with one of your lead magnets.
- If you want to boost traffic to your site, try writing broader content that appeals to a large audience. An approach like this works well for web pages that thrive on ad revenue.
Give readers confidence in what you’re offering.
Show them how well you know what you do.
Build trust.
Offer valuable information and share some of your trade secrets.
Think Like Your Readers
Once you’ve identified your goals and brainstormed some topics to write about, think about what a user might type into Google to learn more about that topic.
Imagine search phrases or questions your audience might search for. Write these out as if you were running a search on Google yourself.
For example, at ClearBrand, one of our specialties is SEO. So, when considering keywords, we’d think of what someone might search for if they want to improve their SEO skills.
Here are some examples of searches our audience might run:
- “How to write a great blog with AI”
- “How to do on-page SEO”
- “What is technical SEO”
- “How to perform a keyword audit for SEO”
- “What free tools are best for SEO”
- “How to write an SEO optimized blog post”
Then add them to your notes under the appropriate topic.
Each search query tells us what people might want to learn or accomplish. So we look at them, learn from them, and write content that gives the people what they want to know.
This sort of approach helps our readers understand the value we have to offer. And it lets us demonstrate that we’re an authority on the subjects we write about.
Perform Keyword Research
Next, you’ll use keyword research tools to discover the actual phrases people use in real searches before you start writing.
First, open Google Keyword Planner with your brainstorming notes in hand, and click Discover New Keywords.
Copy the search phrases you brainstormed for each topic, one at a time. Paste them into the Keyword Planner’s search bar and hit Enter.
The tool will show you related keywords you may want to target in your post.
But don’t just pull the first five terms that show up and call it good.
Review the results carefully to see which keywords best align with your goal, your blog topic, and your audience’s intent.
Pay special attention to two areas: search volume and competition level.
- Search Volume: “Search Volume” shows you how many searches take place for a given keyword each month. Focus on choosing keywords with 1,000+ searches if you want to reach a larger audience.(Note: Keywords with fewer than 1,000 searches per month might not bring in a lot of traffic right away. But don’t count them out; lower-volume terms are still great for writing blog posts when they’re directly related to the product or service you offer.)
- Competition Level: Aim for keywords with low competition whenever possible. Keywords with high competition can be tough to rank for.

Now, choose one primary keyword for each blog post topic. Then look through the remaining keywords for synonyms. You’ll use them as secondary keywords when you begin writing.
As you choose keywords, remember: some terms may be obvious choices because they perfectly align with your topic, have high search volume, and are low in competition.
But other times, you’ll need to weigh the search volume against the competition level to make a smart decision. If there are high-intent terms that have low volume and high competition, you might need to choose different ones.
Once you have a list of focused, relevant keywords, you’ll have a clear guide as you start writing.
Step 2: Learn From Top-Performing Blogs
Once you’ve chosen a primary keyword, your next step is to figure out what kind of content Google already ranks highly for that term.
This gives you insight into the structure, tone, and topics your post needs to cover to compete. It also shows you what kinds of blog post outlines are helping competitors rank for your keyword.
To streamline the process, we recommend using the ClearBrand Blog Research Template. Make a copy and save it to your Google Drive.

Complete the “All Results” Tab
Open your new copy of the research template and go to the tab labeled “All Results.” Replace the keyword cells on line 2 with your primary keyword and up to four supporting terms or synonyms.
Then:
- Open a private browsing window in Chrome.
- Search your primary keyword.
- Open the top 5 organic blog posts (skip any sponsored posts) in new tabs and copy their URLs into the spreadsheet, starting with the column labeled “Keyword 1.”
- Repeat this process for each of the keyword synonyms you found (up to five total × five URLs = 25 URLs).
The spreadsheet will help you organize which blogs are ranking consistently across multiple search terms. But you don’t have to figure that out manually—your spreadsheet includes a tool we built to do it for you.
Use the Script to Populate the “Competitor Article Overview”
Once the “All Results” tab is filled in:
- Click Extensions > Apps Script in the top menu.
- Click Run, then follow the prompts to review and accept permissions.
- Return to the spreadsheet and click Custom Tools > Update Competitor Overview.
The script will identify the top-performing blog posts based on both rank and frequency across your keyword set. These are the competitors you’ll want to learn from as you plan your own blog.
Complete the “Competitor Article Overview” Tab
Next, go to the “Competitor Article Overview” tab. For each of the 5 recommended competitor URLs:
- Open the article in a new tab.
- Activate the Detailed SEO Chrome Extension.
- Copy the Title Tag, Meta Description, and H1 Title into the spreadsheet.
- Click into the “Headings” tab in the extension and copy/paste the outline (H1-H3s) into the corresponding Outline section of the sheet.
Review the Outlines and Read the Articles
Once you’ve added all five outlines, double-check that each article is truly relevant to your keyword.
Read all five articles from start to finish. Take note of:
- Common points they all cover
- Gaps in expertise you can fill
- Interesting ideas, case studies, or SEO tips you want to include
This process helps you understand what to write, and how to write it in a competitive way.
Step 3: Create A Content Editor & Outline
Set Up A Content Editor In Surfer
Now, it’s time to set up a content editor in Surfer.
This tool helps you structure an SEO blog post so that it has a better chance of ranking for the keywords you identified earlier in the Google Keyword Planner.
Log in to Surfer, then use the menu on the left to access the content editor tool and click “Write”.
Then, click Create > + New Content to make a new content editor.
First, adjust the location setting.
Surfer’s recommendations are based on your location. Targeting the right area helps you reach your audience.
If you want your post to rank locally, select the specific city you want to target.
If you’re aiming for a national audience, keep the location set to United States.
Next, enter the keywords you want to focus on.
Start by typing the keywords you chose from the Google Keyword Planner into Surfer’s search bar. Sometimes, Surfer will suggest additional terms.
You can add these suggestions, but be strategic. Here’s what to keep in mind:
- Keyword Priority: Surfer sees the keywords you enter first as highest priority. So the order you enter your keywords will influence Surfer’s final recommendations. For example, if you type “SEO tips” before “How to write a blog,” Surfer will treat “SEO tips” as the main focus, and give it more weight than “How to write a blog” when generating a list of keywords to include in your article.
- Keyword Focus: Keep your primary keyword specific. Aim for 5 synonyms that are ultra-relevant to your topic as supporting keywords. Using keywords with a narrow focus makes it easier to create content that ranks well for your target terms. Don’t add terms that are loosely related to your primary keyword, or you’ll make it harder for Google to understand what you’re writing about.

When you’ve entered your keywords, hit Create for 1 CE credit.
Surfer will generate a personalized guide you can use to start writing an article that keeps readers interested while keeping Google’s search algorithms happy.
Create An Outline
Once your competitor research is complete, you’re ready to create a blog outline that’s built to rank.
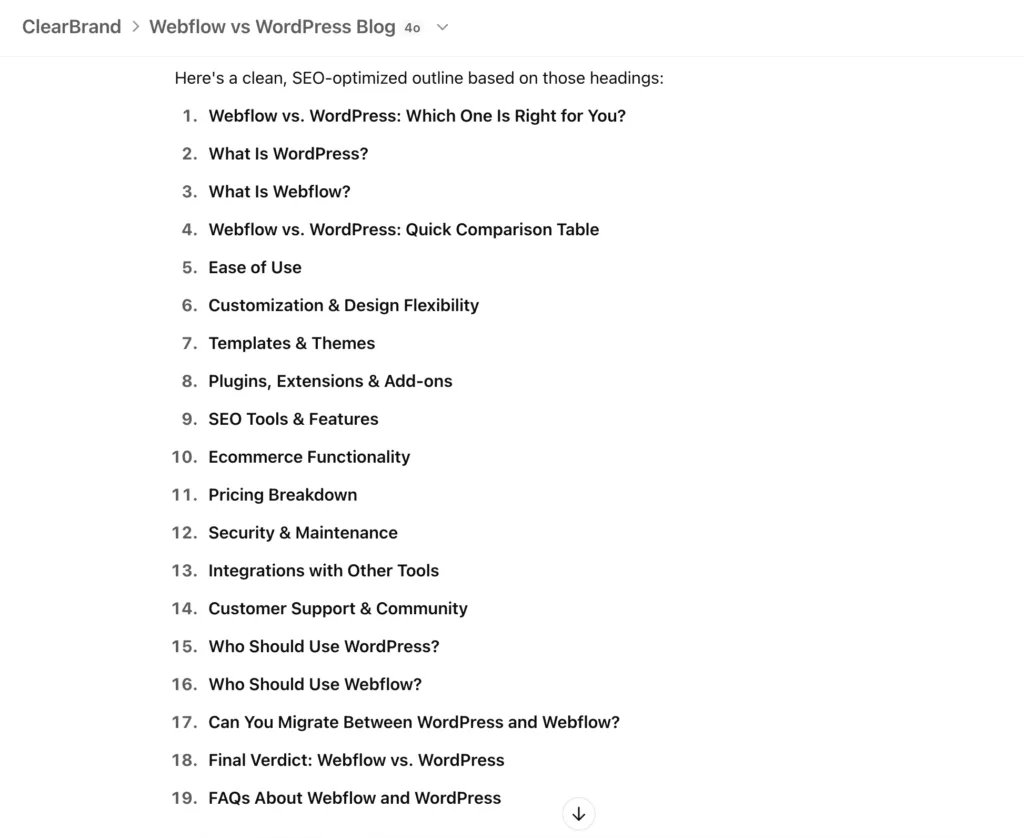
Instead of structuring your post manually, you’ll use ChatGPT to generate a detailed, SEO-friendly outline based on content that’s already performing well on Google.
Use the Research Spreadsheet + ChatGPT to Build Your Outline
Start by opening ChatGPT and navigating to the project you created earlier when preparing your tools. Then, begin a new conversation using this prompt:
We’re going to write a blog optimized for SEO that targets the keyword “[INSERT KEYWORD].” Can you help?
ChatGPT will ask you for the top-ranking blogs for that keyword. To provide that info:
- Open your Competitor Article Overview tab from the research spreadsheet.
- Copy column B (URL, Title Tag, Meta Description, Outline of Headings).
- Paste it into your conversation with ChatGPT one column at a time.
- Repeat for columns C-F.
Press Enter to submit your prompt. GPT will analyze the data and return a proposed blog outline based on what’s currently ranking.
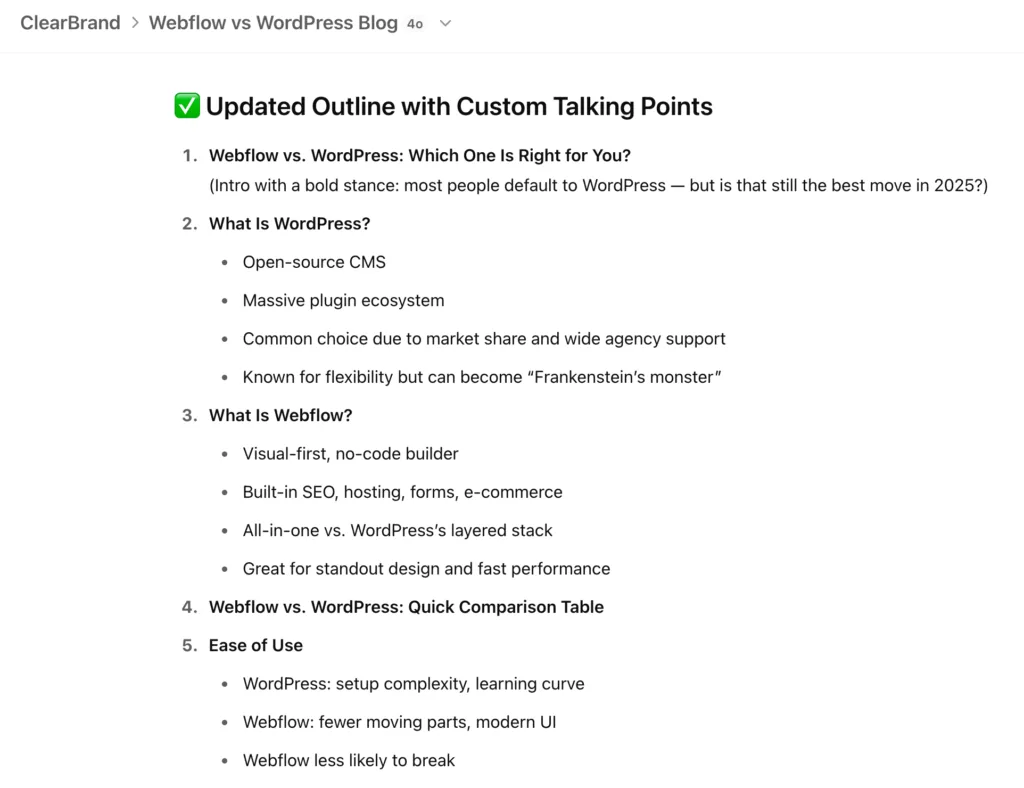
Add Topics You Want to Include
After generating the initial outline, ChatGPT will likely ask if there are any additional points you want to include in your blog.
If you have any topics, subtopics, or unique angles you’d like to add, respond with:
“I also want you to include headings about the following topics. Add them to the outline wherever they fit most logically:
[INSERT TOPICS YOU WANT TO COVER]”
GPT will revise the outline and integrate those topics in a way that fits the overall flow of the article.
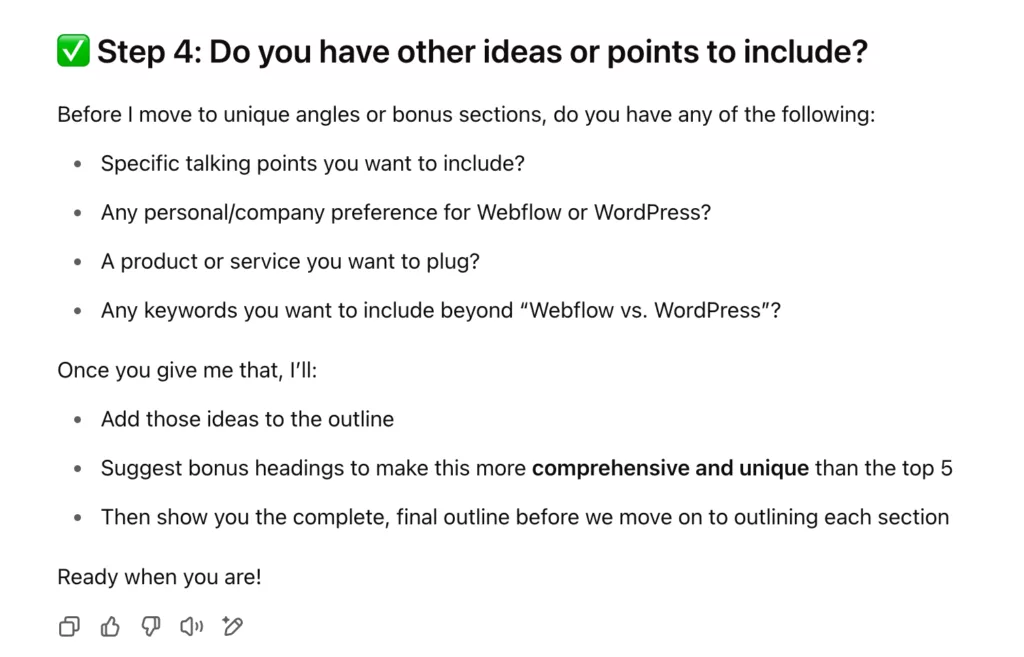
Outline Each Section Of Your Blog With Bullet Points
Once you’re satisfied with the headings for your new blog post, ask ChatGPT to complete the outline with specific bullet points for each section.
When ChatGPT finishes writing the bullet points, review them carefully and make changes where needed.
If there’s anything you’d explain differently (or anything missing), reply with clear feedback and have GPT revise the outline again. This is where you make sure your expertise, examples, and unique value are reflected in the post structure.
Step 4: Draft Your Article
Now that your outline is finalized, it’s time to turn it into a complete blog post.
You’ll use ChatGPT to generate a first draft one section at a time, then paste the content into your Surfer Content Editor.
Use ChatGPT to Write Section by Section
Return to your conversation in ChatGPT and send this prompt to begin the writing process:
“I’m satisfied with the outline and ready to start writing. Let’s go section by section. Provide each section here in Chat. Do NOT provide answers in Canvas mode.”
GPT will write the first section of your blog post and send it back in the chat window.
When you receive the content, copy and paste the section into your Surfer Content Editor.
Then, tell ChatGPT to move on to the next section.
Repeat this process until your entire first draft is complete.
Transfer Your Draft to Google Docs
Once all sections have been written and added to Surfer, copy the full draft and paste it into a fresh copy of the ClearBrand Blog Template you downloaded earlier.
At this point, the draft doesn’t have to be perfect.
You’ll refine it in the next few steps to improve clarity, incorporate your expertise, and boost SEO performance.
Step 5: Review Your Draft & Take Notes
Once your first draft is complete, it’s time to slow down and review the actual writing before making edits.
We recommend doing this step in Google Docs.
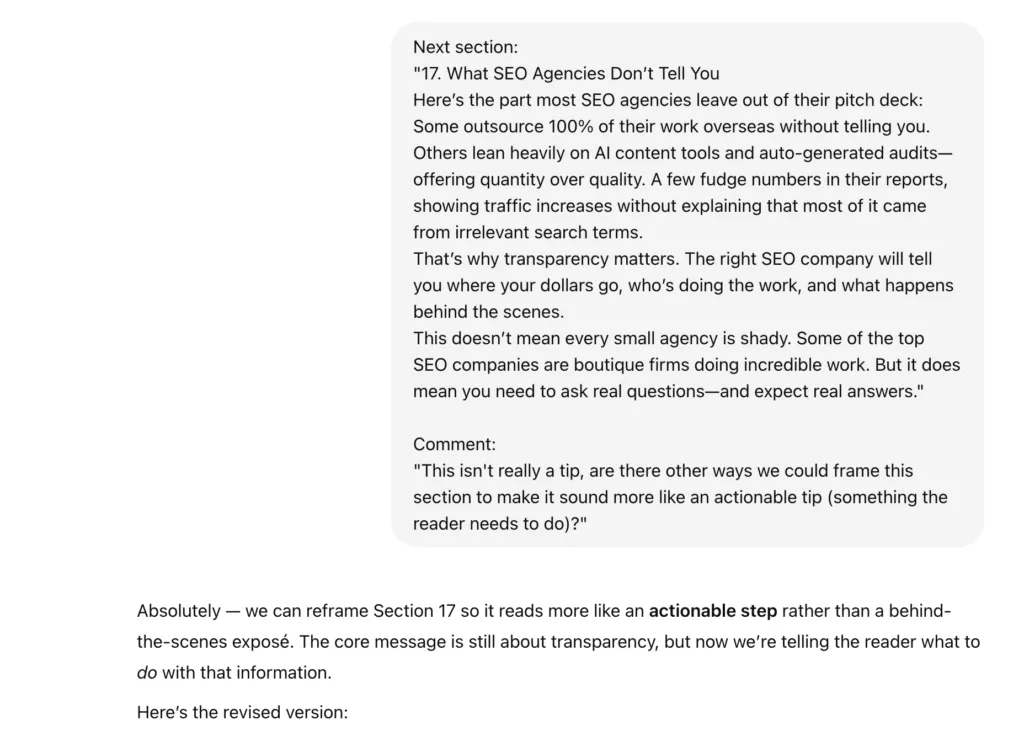
As you read, leave comments on sections that feel confusing, thin, or robotic.
Don’t just write “fix this.” Add specific notes.
What needs to change? And why?
Maybe the section could use more real-life examples, or you spotted an opportunity to inject an interesting idea that sets your blog apart from others.
Use comments to flag topics that need more context. In your comments, provide the additional context. Focus on leaving helpful, structured feedback. It’s going to make the next step faster and easier.
Step 6: Iterate And Refine
Now that you’ve reviewed your draft and left detailed feedback, it’s time to refine your blog post section by section. You’ll be working directly in ChatGPT to make those edits more efficiently.
Go back to your original ChatGPT conversation and paste in this prompt:
“Now, let’s begin editing. I will provide the content that needs to be edited and my feedback on it. You will edit one section at a time to account for my feedback.”
Then, head back to your Google Doc and find the first section where you left a comment.
- Copy and paste the content into ChatGPT between quotation marks.
- Directly beneath it, paste your comment so ChatGPT knows what needs to be fixed.
- If there are multiple comments in the section, you can optionally add the specific line each comment applies to.
Once you receive the revised content, copy it back into your Google Doc and replace the original text. Then move on to the next section and repeat the process until you’ve revised every section with comments.
After that, read through the draft again.
If it still doesn’t feel polished, go back to Step 7 and repeat the process until it does.
Step 7: Add Keywords
Now that your draft is complete, it’s time to add any remaining keywords that didn’t make it into the post naturally the first time around.
This step uses ChatGPT to rewrite your content while incorporating unused SurferSEO terms. The goal here isn’t to stuff in keywords — just to make smart additions that improve SEO performance without sacrificing quality.
How to Add Keywords Using GPT + Surfer
Start by copying the entire draft into ChatGPT, but don’t hit Enter yet.
Then:
- Go to your Surfer Content Editor.
- In the Guidelines panel, click All.
- Click Adjust next to Terms and update the settings like this:
- Count Range: ON
- Optimized Terms: OFF
- Partially Optimized Terms: OFF
- Unused Terms: ON
- Show Ranges: OFF
- Highlight Terms: ON
- Auto Suggestions: OFF
- Show Clusters: OFF
- Click Copy All beneath the list of unused terms.

Return to ChatGPT, and paste the following prompt directly below your blog content (still in the same message, before hitting Enter):
“You’re going to help me add keywords to the post above. Rewrite each of the sections in my blog to incorporate relevant keywords from the list below. Keywords should be added naturally and seamlessly. We only want to add them in places where they won’t impact the meaning or context of the blog’s content. The updated content should NOT sound like it’s stuffing keywords. It should sound 100% natural, like it was written by a human.
Keywords:
[PASTE YOUR KEYWORDS BETWEEN THESE BRACKETS]”
Paste in the list of Surfer keywords between the quotes, then hit Enter to submit the full message.
ChatGPT will return a new version of your blog that includes those terms naturally.
Once it’s done:
- Copy the revised draft back into your Google Doc.
- Paste it into your Surfer Content Editor to view your updated SEO score and make any final keyword tweaks.
This step helps you boost your blog’s performance in search results without affecting flow, clarity, or your voice.
Note: If your blog is long (more than 2,500 words), ChatGPT may struggle to do this for the entire blog at once. Instead, use the prompt above with each section of your blog to achieve the same result.
Step 8: Edit & Fact Check
Now that you’ve added keywords with ChatGPT, it’s time to do a final manual pass in SurferSEO to make sure your post is fully optimized.
Start with Headings
Click over to the Headings tab in the Surfer Content Editor.
Look for any keywords that haven’t been incorporated yet.
Manually add the most relevant ones to your headings wherever they make the most sense. If a heading doesn’t make sense to include, leave it out.

Then Incorporate Keywords from the “All” Tab
Next, return to the All tab in Surfer’s Guidelines panel.
Surfer lists keywords in descending order of impact, so focus on adding the top suggestions first.
Go through your draft and look for places to naturally insert any missed terms. Avoid stuffing. Only add keywords where they genuinely fit.
If some terms clearly don’t belong in your draft, just skip them.
Fact Check Your Content
Once your Surfer edits are complete, copy and paste the full content into your Google Doc and review the full draft for accuracy.
- Highlight every sentence that makes a factual claim.
- Then fact-check those claims to confirm they’re true.
- If anything’s inaccurate, edit or rephrase it so the information is correct.
If you’re using ChatGPT’s DeepResearch tool, it can help you find supporting sources quickly.
Just make sure to double-check those sources. Even if the writing sounds good, a single wrong claim can damage your credibility and hurt trust with readers.
Step 9: Find & Prep Images
Including unique images with optimized alt-text can help your blog rank even higher. So, go back to the Surfer Content Editor and find locations to add images to your post.
Add a line break where you want to add your images so that it’s easy to return and add them to your post later.
Choose Your Images
Find the images you want to add to your post. You can use your own, generate them with AI (if you’re feeling bold), or you can download them from a stock photo website like iStock (paid), Pixabay (free), or Pexels (free).
Then, add the photos you want to include to your Surfer content editor. Go through your content, find the line breaks you added a moment ago, and add the images to the body of your post.
Write Alt Text For Each Image
Once you’ve got the images in your post, write alt text (alternative text) for each one.
Alt text is descriptive text that increases accessibility for visually impaired users who load your site with screen readers. It also appears on your site when images fail to load.
When you write alt text, keep it short (120 characters or less) and descriptive. If you can add keywords, great. But your primary focus should be on writing clear, descriptive text that describes what’s happening in each image.
Here’s an example of good alt text, written for the image below:
“A businessman wearing a suit sits in a modern office, taking notes on his laptop about how to write a blog post.”

Step 10: Choose A URL, Title Tag & Meta Description
URL (Slug)
Choose a URL (also known as a “slug”) for your blog post that includes your target keyword. Keep it short, simple, and focused.
Including the keyword in your URL helps search engines understand what your post is about.
For example, if your keyword is “best blog post,” your URL could be something like “yourblogdomain.com/best-blog-post.”
Avoid using numbers, dates, or anything that might change over time as part of your URL. This keeps you from needing to update the URL and create a redirect if you edit the post later.
If you’re unsure about the best option for your URL, look back at the top-ranking blogs you studied earlier. See how competitors have structured their URLs for inspiration. Then do something similar for your own.
Title Tag
A title tag is the clickable blue text that appears in Google search results and links to your blog.
Like your URL and meta description, it’s best to include your primary keyword in the title tag.
For example, if your post focuses on “how to write a great blog,” then your title tag should include that exact phrase, like this:
“How to Write a Great Blog Post In 10 Steps”
Look at the research spreadsheet you completed earlier to see what competitors are using for their title tags, and use them to inspire your own.
Aim for a maximum of 60 characters so the full title displays in search results. Keeping it short and simple prevents text from being cut off, especially on smaller screens.

Meta Description
Meta descriptions are short summaries of your blog posts that appear in search results. They give users a quick preview of the content before they click. Write a 1-2 sentence description that’s under 150 characters to fit within Google’s display limits.
Place your main keyword at the beginning of the meta description if possible. Keep the rest of your description focused on the value users get from reading the post.
For example, if your keyword is “conduct keyword research,” your description might be:
“Conduct keyword research like a pro. This guide shows you how to create a keyword strategy step by step.”
Keeping it short, clear, and focused on the primary keyword will improve the chances of your post standing out in search results.

Step 11: Add Links & Check Your CTA
Internal Links
Internal links let you pass SEO power from pre-existing pages and posts into the new blog. Strong internal links help make sure that your new posts are as powerful as possible, right out of the gate.
Look through your website’s existing pages and blog posts. Take note of related pages that would make sense to link to in the blog you just wrote.
In general, you want internal links to be in the same category as the blog you’re going to post.
So if you wrote a blog about SEO, you’d want to link to other blogs or service pages related to SEO in your new post.
To maximize the benefits you get from your internal links, you can also link to the blog post you’re writing from other internal pages and posts on your site. This lets you transfer as much authority as possible to your new post.
External Links
External links let your post reference pages on other websites.
Linking to other articles and resources from trusted websites helps show that your post is well-researched and reliable.
Choose external links that naturally support the points in your post.
For example, if you’re discussing SEO strategies, you might link to studies or official guides on best practices.
It’s also important to avoid linking to low-quality sites. They can hurt your post’s credibility.
Low-quality links often come from sites with thin content, too many ads, or a lack of authority in the field.
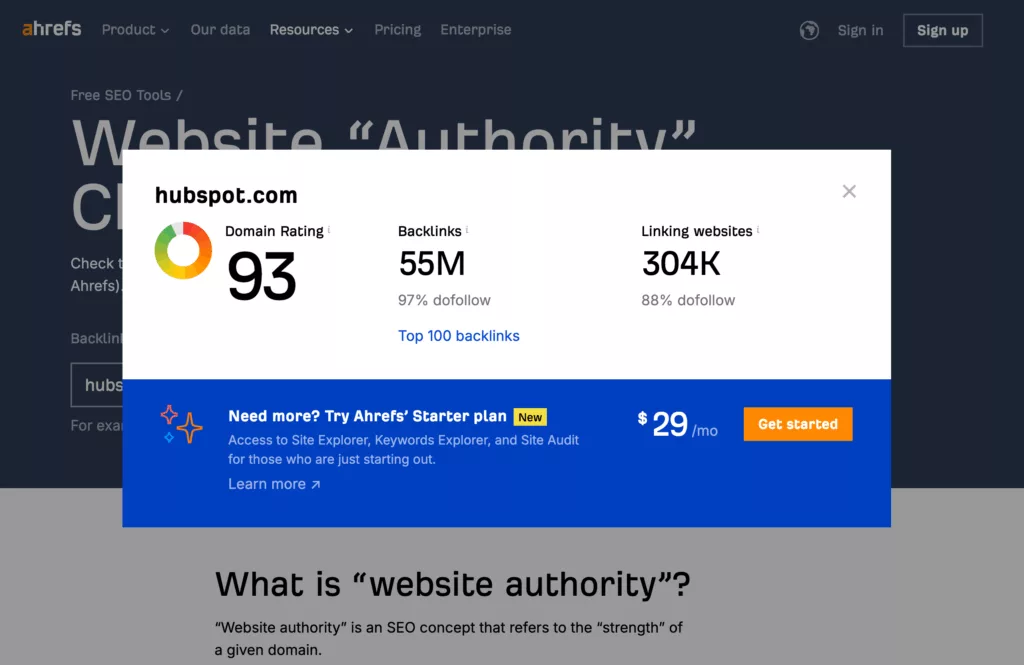
You can use Ahrefs’s free Domain Authority Checker to see the authority of the sites you want to link to.
If the authority score is less than 20, consider omitting links to that site in your post or changing it to a link from a site with higher authority.
You can also weed out low-quality sites by looking for signs like poor grammar, outdated information, or spammy practices (like overly aggressive pop-ups or obvious keyword stuffing).
Add A Call To Action
Adding a call-to-action (CTA) at the end of the post gives readers a clear idea of what steps you want them to take next.
To wrap up your blog post, create a CTA that links readers to your contact page or a service page relevant to your post.
Place the CTA at the end of your post, and keep it short and direct. For example:
“Ready to boost your SEO? Schedule a call with our team to get started.”
Then add a link to your CTA so that users don’t have to click around your website to figure out how to get in touch.

Step 12: Publish Your Blog Post
Now that your post is polished and ready to go, it’s time to post it on your website.
How to post mainly depends on your CMS. There are generally two ways to publish.
You can use a visual editor to copy and paste your content from a Google Doc (or from a tool like the Surfer Editor), or you can use a code editor to enter your post as raw HTML code.
At ClearBrand, we work with Webflow and WordPress users. When we upload our posts in WordPress, we almost always use the built-in code editor.
The reason we prefer to use a code editor rather than a visual editor is to keep our blog styling consistent.
If you upload your posts using a code editor, you can check and verify that you’re not adding unnecessary style tags in your post.
But if you upload your new post with a visual editor, you don’t get this control. That means that you may publish content with styles that don’t align with your brand!
If possible, upload your new blog post using a code editor. You can take your finished content from the Surfer editor and place it into a tool like Word2CleanHTML to turn it into code you can paste into your site. Or you can use a script that turns your documents into ready-to-use HTML.
If you don’t have access to a code editor, you can still use a visual editor to upload your post. Just preview the content and review the layout to make sure it looks great before you hit publish.
Looking for an easier way to convert your blog content to clean HTML in Google Docs? We provide a script in our “Ultimate Guide To Writing A Blog” pack.
Click below to download the ONLY guide you need to write human-sounding blog content that actually ranks. You’ll gain access to:
- A blog template with custom scripts that slash publishing time by 50%
- A full list of customizable project instructions you can use to capture your brand’s voice
- A research template that helps you analyze rankings 4X faster
- A complete writing checklist that covers all SEO best practices
This is a complete system for writing blogs with AI, click-by-click…and IT’S FREE!
Download The Blog Template Here
That’s it! Congratulations! You just published an amazing blog post in a fraction of the time it would’ve taken you to write it manually.
BONUS: Write And Send A Broadcast Email To Go With The Blog Post
Your blog is polished and live. But publishing alone won’t bring in readers — you need to let people know about it!
Write a short email to your mailing list and invite them to check out your latest post.
Briefly highlight what the blog covers and why it’s valuable to them.
The goal is to create excitement and curiosity, so they’ll want to click and read the whole thing.
Promote the Final Article
Once the blog is published and your email is sent, don’t forget to promote it on social media too.
Share a quick summary or a key takeaway from the post, and link back to the blog in your social media posts.
Need Help With Blog Writing?
Using AI to write blogs that rank well on Google is a straightforward process, but it still takes careful planning and time.
For many business owners, time is precious, which makes it hard to give your blog the attention it deserves.
If you’re looking for effective, high-ranking blog content that connects with qualified leads, reach out to ClearBrand today.
We specialize in personalized SEO strategies that attract your ideal audience and drive more traffic to your site, so you can focus on closing deals.
If you found this article valuable, here are some others we think you’ll love:
- SEO Marketing: 5 Simple Steps To Get More Web Traffic
- Story-Driven Marketing
- Best Story-Based Website Examples
How To Write A Blog Post: FAQs
Does Writing Multiple Blog Posts For The Same Keyword Help Me Rank Higher On Search Engines?
No. This causes keyword cannibalization. Search engines won’t be able to easily tell which blog post is the most relevant to your keyword, and neither post will rank as high as it should.
How Can I Tell If I Wrote A Good Blog?
Use tools like Google Analytics and Google Search Console to monitor clicks, impressions, and position. If they’re consistently rising over time, you know you wrote a solid post.
Do I Need To Add Internal And External Links To My Blog?
Google looks at internal and external links when assessing the quality of a blog post. Add them to every post you write.
Why Should I Use A Keyword In My Blog Post Titles, URLs, And Meta-Descriptions?
Using your primary keyword in these places makes it easier for Google to see how your post relates to a specific keyword. Using the same keyword in all three areas shows Google that your content covers one specific topic.
What Is The Best Way To Find Related Keywords To Target In Blog Posts?
Google Search Console is the best way to find related keywords for blogs that are getting clicks and impressions. Google Keyword Planner is the best tool to find related keywords for blogs you plan to write in the future.
What’s Better: The Yoast SEO Plugin, Or RankMath?
If you want more features for free and a modern, detailed interface, Rank Math might be a better choice. Yoast SEO is simple and reliable, but skips out on some advanced features unless you buy the premium version. For most users looking for value, Rank Math offers more without extra costs.
How Important Are Backlinks For Ranking On Google?
Backlinks are a huge factor in your search rankings. If other domains are linking to yours, Google views it as a sign of trust. The more backlinks you receive from high-authority sites, the easier it is to reach the top of search rankings.
What Is The Easiest Way To Get Backlinks?
The easiest way is to make sure your company is listed on local and national directories (like Yelp, Waze, Glassdoor, industry-specific directories, etc.). When you run out of directories to join, try other methods like guest blogging or building online tools that other sites will link to.
Will I Get Leads From Blog Posts?
Blog posts tend to lead to increases in blog traffic instead of increased leads. If you need more leads, you might need to focus on optimizing landing pages for search engines and conversions instead of writing other posts.
How Do I Write A Good Blog Post Title?
Include your SEO keyword at the beginning of the blog name. Keep your language tight, clear, and descriptive. Users should be able to tell you what the post is about just by reading the title.
Should I Publish New Articles On A Dedicated Blog Domain?
Generally, no. This makes it harder to track your site’s overall traffic in tools like Google Search Console. If you create a subdomain for your blog, you have to create a separate property in Google Search Console.
I’ve Done Everything In This Article. I’m Still Not The First Post To Show Up In Search. Why?
Google looks at many factors to choose who shows up first. Even if you’re writing 100% SEO-friendly blog posts, your site may need to build more momentum before you show up in search results. Google looks at factors including your H1 blog title, post content, meta description, and alt-text, the age of your post, and much, much more. If you need to improve your rankings, schedule a call with ClearBrand to discuss how we can help.