The platform isn’t your problem
You launched a blog on Webflow, published a handful of posts, and watched Google Search Console sit at zero impressions for six weeks. The instinct is to blame the platform. Webflow is the new kid. Maybe it can’t rank.
That’s not what’s happening.
Webflow generates clean semantic HTML, hosts on AWS with a global CDN, and ships SSL on every paid plan. The technical foundation is strong. The gap is almost always in how you configure the CMS before you publish your first post, and in the decisions you make about URL structure, indexing, and schema that most Webflow users skip entirely.
At ClearBrand, we’ve built and optimized Webflow blogs for companies scaling past $1M in revenue. The patterns that hold back organic growth are consistent: wrong URL structure, CMS collections without dedicated SEO fields, and low-value pages burning crawl budget. This guide covers all of it in order.
Start with URL structure: root domain, not subdomain
The biggest SEO decision you make for your Webflow blog happens before you write a word.
Webflow’s default CMS blog setup puts your posts at yourdomain.com/blog. That’s where you want them. The problem shows up when teams build a separate Webflow project for their blog and connect it as blog.yourdomain.com. Google treats that subdomain as a separate website. Backlinks pointing to your blog posts won’t strengthen your main site’s authority. Your blog doesn’t inherit the domain equity your main site has built.
The practical math: a blog at yourdomain.com/blog starts with your site’s full domain authority on day one. A blog at blog.yourdomain.com starts at zero.
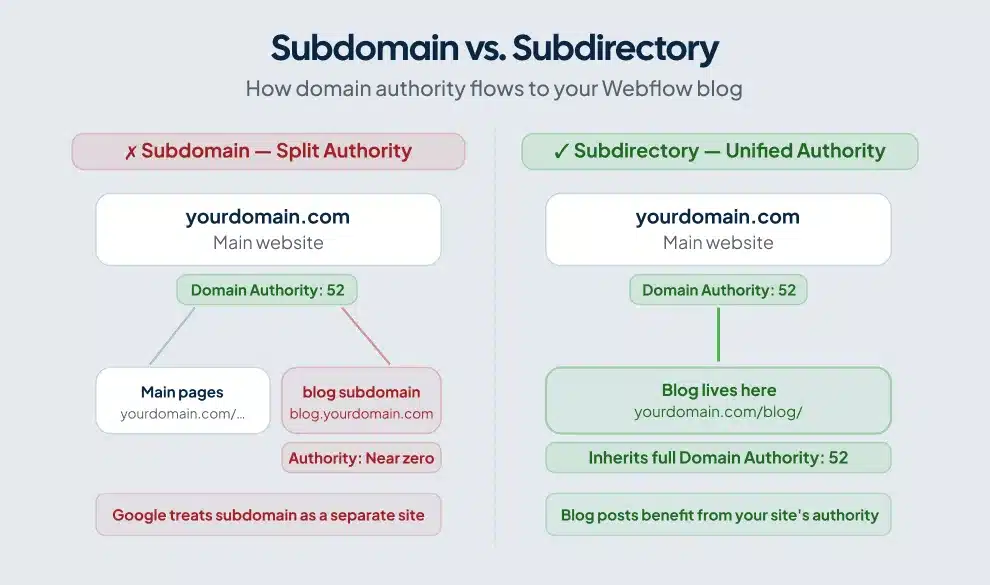
Webflow’s standard CMS collection setup uses a subfolder by default, so most users get this right without thinking about it. The risk comes when you try to run your blog as a separate Webflow project. If you need two projects under one domain, Subfold lets you proxy a separate Webflow project into /blog without purchasing a Webflow Enterprise plan. The setup takes an afternoon. The SEO compounding starts immediately.
Build SEO fields into your CMS collection from day one
A default Webflow blog CMS collection includes a title, a rich text body, a featured image, and a publish date. That’s enough to display posts. It won’t rank them.
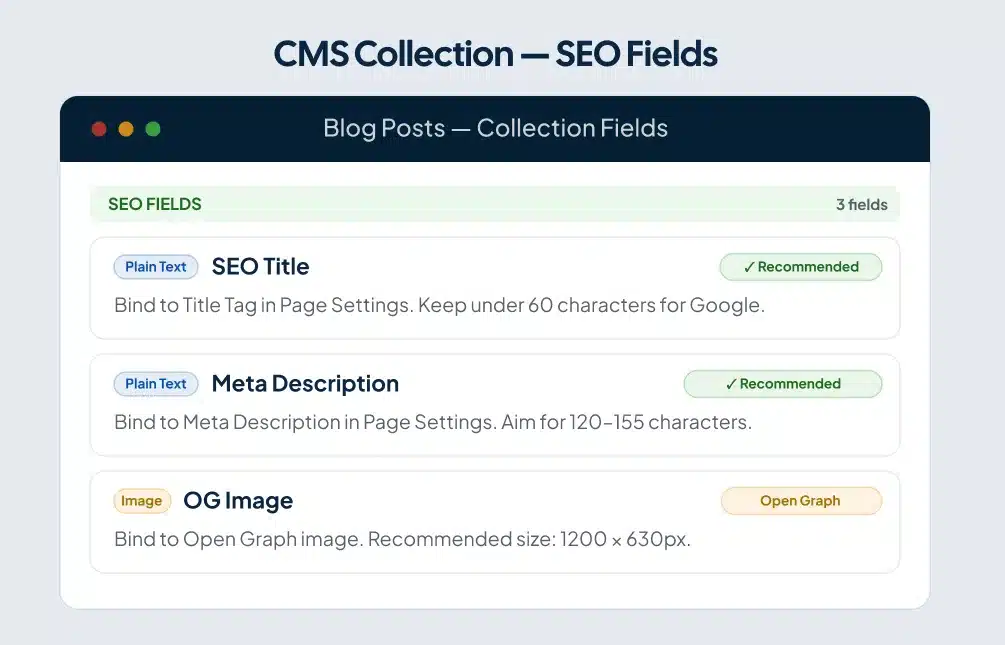
When <a href=”/blog/webflow-cms-seo”>structuring CMS collections for SEO</a>, add these fields to your Blog Posts collection before you create a single item:
SEO Title (plain text, 60-character limit): A field separate from your post headline. Your H1 and your title tag should be related but don’t need to be identical. The SEO Title field lets you write a keyword-optimized tag without compromising your reader-facing headline. Writers control it directly without touching the Webflow designer.
Meta Description (plain text, 155-character limit): Bind this to the meta description setting in your collection template’s Page Settings. Webflow auto-populates every new post’s meta description from this field. For deeper guidance on <a href=”/blog/webflow-meta-descriptions”>writing meta descriptions for blog posts</a> that drive clicks, the field setup is only half the battle — the copy itself matters as much as the binding. Your writers fill it in when they publish, and the tag appears correctly in search results without anyone touching code.
OG Image (image field): The Open Graph image controls how your post appears when shared on LinkedIn, Slack, and X. Posts with a custom OG image consistently pull more clicks from social than posts that default to Webflow’s placeholder. More clicks feed engagement signals back to Google over time.
Alt Text for Featured Image (plain text): Add this as a CMS field and bind it to your featured image’s alt text attribute in the designer. Set it up once on the template. After that, writers fill in the alt text for every post alongside the rest of their content, no designer access required.
Slug (auto-generated, manually editable): Webflow generates slugs from the post title. Train your team to edit slugs before publishing. Remove stop words. A post titled “The Complete Guide to Webflow CMS Collections for SEO” should have a slug like webflow-cms-seo-guide, not the full title string.
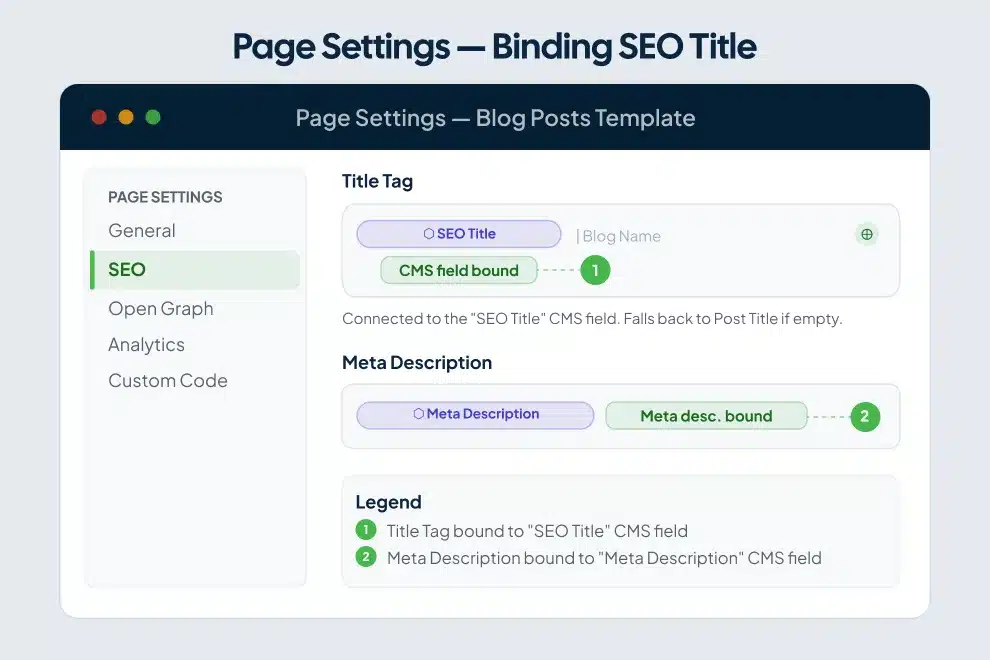
Once you’ve built these fields, go into your collection template’s Page Settings and bind each one. SEO Title binds to the Title Tag. Meta Description binds to the Meta Description field. OG Image binds to the Open Graph Image. You configure this once on the template, and every post you publish inherits the correct structure.
Control what Google indexes
Webflow creates multiple pages when you set up a CMS collection: the main blog index, individual post pages, and any filtered or tag-based archive pages you build. Google doesn’t need to index all of them, and indexing low-value pages costs you crawl budget that should go toward your posts.
Tag archive pages with two or three items, search result pages, and pagination variants are thin content. They rarely rank for anything, and they signal to Google that a portion of your site has low information value. Go into the Page Settings for these templates and toggle “Disable Indexing.”
The pages worth indexing: individual blog posts, your main blog index, and category landing pages with substantive content above a list of links.
Also check your staging URL. Webflow creates a preview domain for every project, formatted as yoursite.webflow.io. If Google indexes that URL alongside your primary domain, you’ve created duplicate content. In Project Settings under Publishing, enable “Disable subdomain indexing.” This blocks Googlebot from crawling the staging version entirely.
Write title tags and meta descriptions that earn the click
Google may rewrite your title tag if it decides your version doesn’t serve the query. You reduce that risk by writing titles that are specific, accurate, and under 60 characters.
A structure that works: [Primary Keyword]: [Specific Promise or Outcome]
- “Webflow CMS SEO: Set Up Blog Posts That Rank”
- “Webflow Blog Setup: 9 Steps to Optimize Before Publishing”
Put your primary keyword in the first 60 characters. Webflow’s Page Settings preview shows you the snippet as Google would display it, including a character count warning. Use it before you publish.
Meta descriptions are ad copy, not summaries. Google pulls from them when they match a user’s query, so write for the click. Aim for 140-155 characters. Include your keyword. Include a concrete benefit. The meta description doesn’t directly affect rankings, but it affects click-through rate, which affects traffic, which feeds back into rankings over time.
Don’t write the same description for multiple posts. If you’ve bound the Meta Description CMS field to the template correctly, each post’s writer controls this independently and your descriptions stay unique automatically.
Use heading hierarchy correctly
Webflow’s rich text field supports H1 through H6. Your collection template should bind the post title to an H1 tag via the field connection you set up. Everything inside the rich text body starts at H2 and works down.
The common mistake on Webflow blogs: writers use bold text or H4 for visual emphasis instead of semantic headings, because the designer makes it easy to style things without understanding the structure behind them. Google uses heading hierarchy to understand which subtopics a post covers and how they relate to each other. Bold text gives Google nothing.
Set up your rich text styles on the template so that H2 through H4 are visually distinct from body copy. Give writers a clear reference for which heading level to use for major sections versus supporting points. The structure trains itself once the visual cues are right.
Your primary keyword should appear in at least one H2. Semantic variations, related phrases, and synonym terms belong in other headings. Google reads the heading hierarchy as a table of contents for the post. A post about Webflow blog SEO with headings only about “optimization” and “settings” gives Google less topical signal than headings that use the actual terminology searchers use.
Image optimization inside Webflow blogs
Webflow handles responsive images automatically, generating multiple sizes for different viewport widths. That removes a significant technical overhead you’d manage manually in WordPress. But Webflow can’t fix what you upload before it arrives.
For a full breakdown of formats, compression targets, and CMS image field setup, the <a href=”/blog/webflow-image-optimization”>guide to optimizing images in blog posts</a> covers the complete workflow. The essentials:
Compress images before uploading. Target under 150KB for body images and under 100KB for thumbnails. Use WebP where possible. Webflow accepts WebP natively, and WebP files typically run 25-30% smaller than equivalent JPEGs at comparable visual quality.
Rename files before uploading. IMG_4823.jpg helps no one. webflow-cms-collection-setup.webp tells Google what the image depicts and contributes to image search indexing. This step takes five seconds and writers routinely skip it.
Write specific alt text. “Webflow CMS collection settings panel showing SEO title and meta description fields” is useful. “Screenshot of Webflow” is not. Alt text serves two purposes: accessibility for screen readers, and topical context for Google’s image crawler. If the image supports a specific point in the body copy, the alt text should reflect that point.
Build internal links with structure, not habit
Internal links help Google discover pages and pass authority from high-traffic posts to newer ones. Most Webflow blogs underinvest in both.
Start with the mechanical layer. In your Blog Posts CMS collection, add a “Related Posts” multi-reference field. On your collection template page, add a Related Posts section bound to that field as a dynamic list. Writers select 2-3 related posts when they publish, and Webflow renders those links automatically on every post page. This one template change creates a structured internal linking layer that scales with your content library.
Then layer in strategic contextual links. If you have a post that receives steady traffic, maybe 400-600 visits per month on a topic adjacent to a new post you’re publishing, add a contextual link from the high-traffic post to the new one. A single link from an established page passes authority faster than waiting for Google to discover the new post through your sitemap alone.
For teams producing high content volume, <a href=”/blog/webflow-programmatic-seo”>scaling blog content with programmatic SEO</a> covers how to structure CMS collections so internal linking happens at the template level rather than post by post.
Use descriptive anchor text. “Read our Webflow CMS guide” beats “click here” for both user clarity and SEO signal. Avoid linking to the same page with wildly different anchor text across multiple posts. Consistency helps Google build an accurate picture of your site’s content relationships.
Add Article schema to every post
Schema markup tells Google what type of content a page contains. For a Webflow blog, the two relevant types are Article schema on every post, and FAQPage schema on posts that include a FAQ section.
Webflow supports custom JSON-LD in the Page Settings custom code block. For a CMS collection, you write the schema once on the template page and use Webflow’s {{wf}} binding syntax to pull field values dynamically. The result: unique, accurate schema generated automatically for every post from a single template.
A working Article schema for a Webflow blog collection template looks like this:
<script type="application/ld+json">
{
  "@context": "https://schema.org",
  "@type": "Article",
  "headline": "{{wf {\"path\":\"name\",\"type\":\"PlainText\"} }}",
  "datePublished": "{{wf {\"path\":\"published-on\",\"type\":\"Date\",\"format\":\"MMMM D, YYYY\"} }}",
  "author": {
    "@type": "Organization",
    "name": "ClearBrand"
  },
  "publisher": {
    "@type": "Organization",
    "name": "ClearBrand",
    "logo": {
      "@type": "ImageObject",
      "url": "https://yourdomain.com/logo.png"
    }
  }
}
</script>
Paste this into the Before </body> custom code block on your collection template page. Webflow fills in the headline and publish date from your CMS fields for every item. Swap in your actual organization name and logo URL. A developer can set this up in under 30 minutes.
Add FAQPage schema to posts with a dedicated FAQ section. This schema type qualifies for the FAQ rich result in Google, which can expand your search listing with accordion-style questions and roughly double your click-through rate on competitive queries. Validate all schema using Google’s Rich Results Test before the post goes live.
Core Web Vitals: the mobile score is the real score
Google uses Core Web Vitals as a ranking signal, and blog posts on content-heavy sites frequently fail on Largest Contentful Paint because of large featured images loading above the fold.
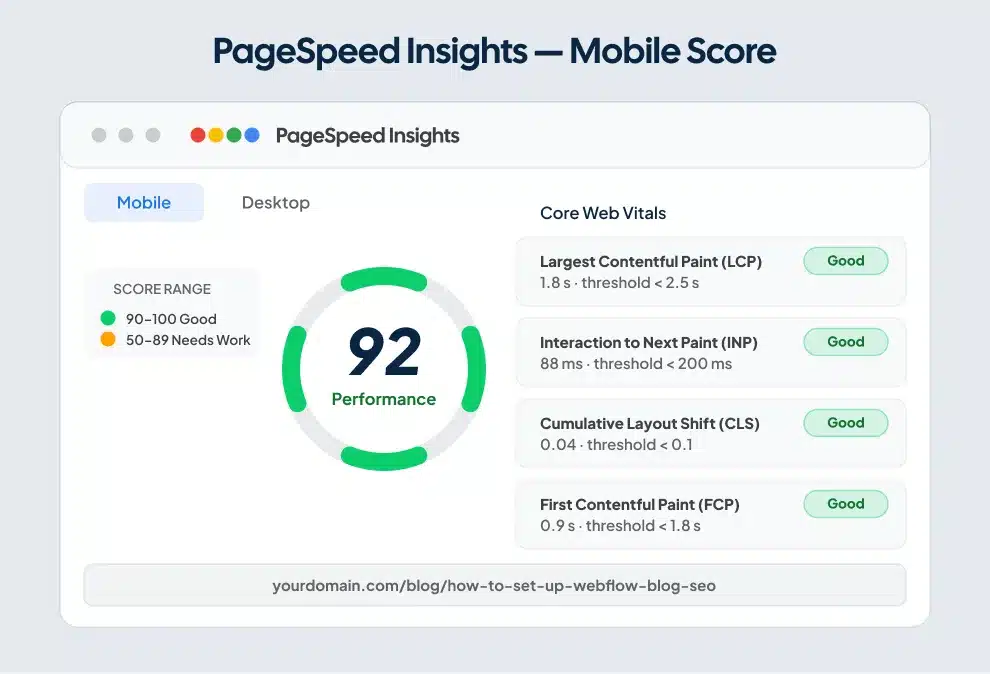
In Webflow, disable lazy loading on your featured image. Webflow applies lazy loading by default to all images, but the featured image at the top of a post is typically the LCP element. If Google’s crawler waits for a lazy load trigger to fetch it, your LCP score suffers. Enable lazy loading on images below the fold, and turn it off for the featured image.
Limit third-party scripts. Chat widgets, heatmap tools, video embeds, and analytics tags each add latency. Load non-critical scripts asynchronously or defer them through Webflow’s custom code section. A post that scores 92 on desktop and 61 on mobile has a mobile performance problem, regardless of how fast it loads on your laptop.
Run your posts through Google PageSpeed Insights. Look at the mobile score specifically. Google uses mobile-first indexing, meaning the mobile version of your page determines your ranking, even if most of your readers are on desktop.
Webflow’s built-in CDN, powered by AWS and Fastly, handles global delivery well. You rarely need a separate CDN layer on top of Webflow hosting. The performance problems we see on Webflow blogs come from upload practices and third-party scripts, not from the hosting infrastructure.
Optimize your blog for AI search
Google’s AI Overviews, ChatGPT, and Perplexity pull from well-structured, clearly sourced content. The same factors that help you rank on page one help your content get cited in AI-generated answers, but with a few specific additions worth building into your workflow.
Format answers for extraction. When your post answers a specific question, put the direct answer in the first 40-60 words of that section, before supporting context or caveats. AI systems extract the most concise, direct answer they find on a page. A buried answer gets missed, even if the rest of the section is thorough.
Use clear entity relationships. Name things specifically. “Webflow’s CMS collection template page controls the meta title for every blog post in that collection” is a specific, extractable statement that AI systems can cite. “You can manage your SEO settings inside Webflow” is too vague to pull from.
Add a FAQ section to posts targeting competitive queries. Format each question as an H3 and answer it directly in the first sentence. Mark the section up with FAQPage schema. AI search systems treat structured FAQ content as pre-formatted answers, and they pull from it frequently. For a deeper look at the full AEO approach, the <a href=”/blog/webflow-aeo”>guide to optimizing for AI search</a> covers entity mapping, structured data, and content formatting for AI citation.
Connect Google Search Console and act on the data
Webflow auto-generates your sitemap at yourdomain.com/sitemap.xml and updates it every time you publish. Submit that URL to Google Search Console after launching your blog. Resubmit after major structural changes, like adding a new collection or changing your URL slugs.
In Search Console, watch two reports: Coverage and Performance by Query. Coverage shows indexing errors, pages Google found but couldn’t process, or pages blocked by your robots.txt. Performance by Query shows which keywords your posts rank for, their average position, and click-through rate.
A post ranking in positions 8-15 for a keyword is worth revising before you write a new post. Update the title tag to better match the query. Add a section that covers the specific angle searchers want. Improve the internal linking from related high-traffic posts. A post moving from position 12 to position 5 on an established keyword will typically drive three to four times more clicks. The math favors revision over volume, at least until your top posts are ranking in the top five.
Frequently asked questions
Is Webflow good for blog SEO?
Webflow is a strong platform for blog SEO. It generates clean semantic HTML, includes SSL and CDN hosting on all paid plans, auto-generates sitemaps, and gives you direct control over meta titles, descriptions, canonical tags, and schema markup, all without plugins. The tradeoff is that Webflow requires more intentional setup than WordPress with Yoast installed, particularly for CMS collections. Configure your fields and template bindings correctly from the start, and Webflow performs as well as any major CMS for organic rankings.
Should my Webflow blog be on a subdomain or subdirectory?
A subdirectory (yourdomain.com/blog) is better for SEO. Google treats subdomains as separate websites, so a blog at blog.yourdomain.com doesn’t inherit the domain authority your main site has earned. A blog at yourdomain.com/blog does. Webflow’s default CMS blog setup uses a subdirectory, so most users get this right by default. Only use a subdomain if a technical constraint makes a subfolder setup impossible.
How do I add schema markup to Webflow blog posts?
Paste JSON-LD schema into the custom code block in your collection template’s Page Settings. Use Webflow’s {{wf}} field binding syntax to pull the post headline and publish date from your CMS fields automatically. This generates unique, accurate schema for every post from a single template setup. Validate the output with Google’s Rich Results Test before publishing. A developer can configure this in under an hour.
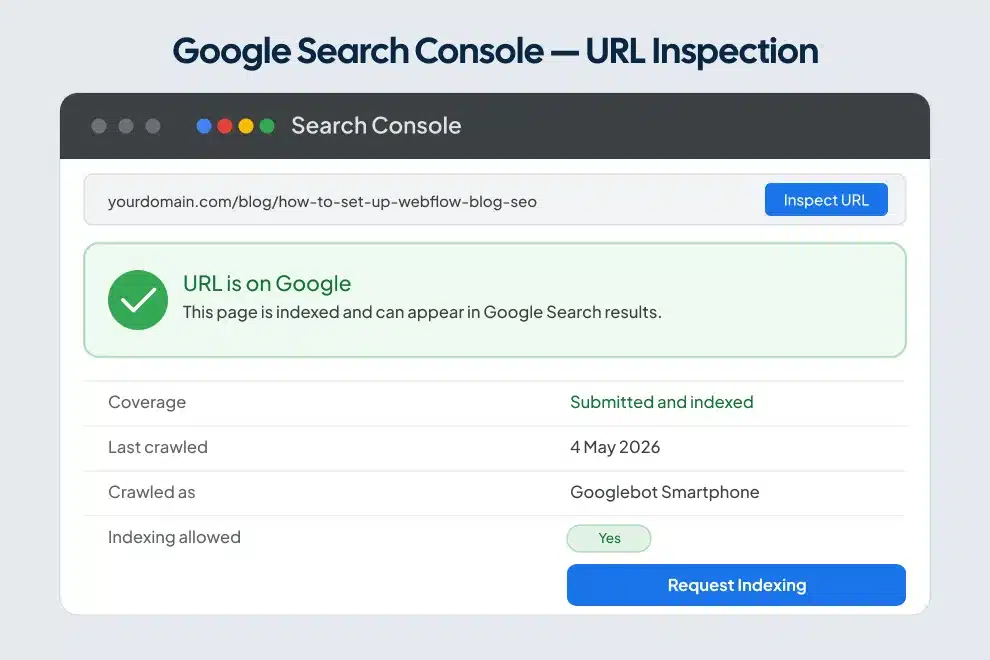
How do I get Webflow blog posts indexed by Google?
Submit your sitemap (yourdomain.com/sitemap.xml) to Google Search Console. Verify that your blog post template page doesn’t have “Disable Indexing” toggled on in Page Settings. Check that your robots.txt doesn’t block the /blog path. For individual posts, paste the URL into Search Console’s URL Inspection tool and click “Request Indexing.” Google typically crawls new posts within a few days on active domains.
Does Webflow automatically create SEO meta tags for blog posts?
Webflow generates a default title tag from the page name if you don’t specify one. For CMS collections, you can create a title tag template in the collection’s page settings that auto-populates from CMS fields. The better approach: create a dedicated SEO Title field in your CMS collection and bind it to the title tag in your template settings. That gives writers explicit control over what appears in search results without them needing access to the Webflow designer.
Get the structure right first
A blog with 10 posts configured correctly will outrank a blog with 50 posts configured wrong. Google has to trust what it can crawl before it ranks what you’ve written.
Set up your CMS collection fields. Bind them to your template. Block low-value pages from indexing. Submit your sitemap to Search Console. Then write, publish, and build internal links as your content library grows. The compounding starts from the first post when the foundation is solid.
Check the <a href=”/blog/webflow-seo-checklist”>full Webflow SEO checklist</a> to confirm you’ve covered every setup step before you scale your content volume. And if you want a Webflow blog built to rank from day one, <a href=”/webflow-seo-services”>our Webflow blog SEO services</a> are built for exactly that.