Google Search Console is free, built by Google, and tells you exactly how Google sees your site. Most Webflow users either skip it entirely or connect it once and forget it exists.
Both approaches leave ranking opportunities on the table.
This guide covers the full setup, sitemap submission, the Webflow-specific mistakes that silently kill indexing, and how to read the reports that actually move rankings. Setup takes ten minutes. The payoff compounds for months.
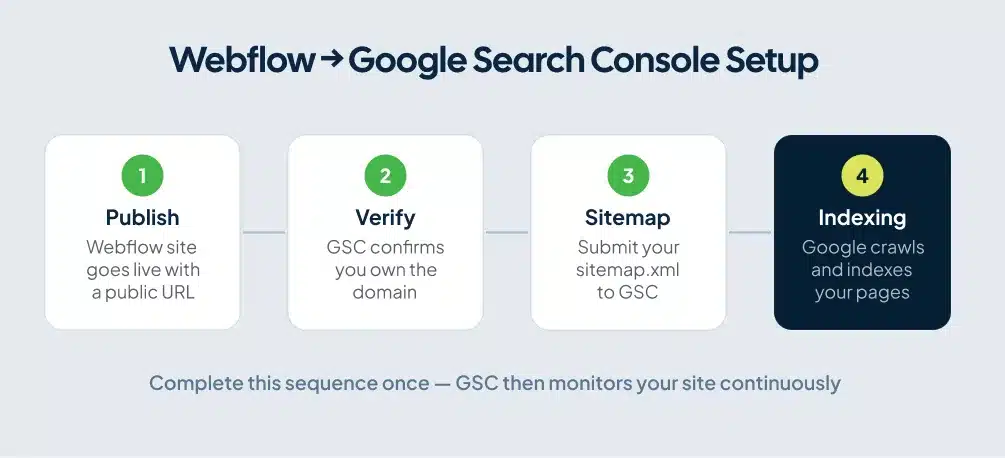
What Google Search Console actually does
GSC gives you direct visibility into how Google crawls, indexes, and ranks your pages. It shows which search queries bring people to your site, which pages Google has indexed, and which pages it found but chose to ignore.
Webflow handles a lot of technical SEO automatically: clean code, sitemap generation, canonical URL controls, and page-level noindex settings. GSC is what tells you whether those settings are working or whether something is quietly blocking your traffic.
A useful way to think about it: Webflow is the kitchen. GSC is the feedback telling you what Google thinks of the meal.
Two ways to connect Webflow to Google Search Console
There are two reliable methods. The native app is faster. The HTML tag method gives you more control, especially when managing a site for a client.
Method 1: The Webflow Google Site Tools App
Webflow has a native integration that connects GA4, Google Tag Manager, and Google Search Console from one place.
- Open your Webflow Dashboard and go to your site’s Site Settings.
- Click Apps & Integrations in the left sidebar.
- Find Google Site Tools and click Install.
- Sign in with your Google account, select your GSC account and property, and follow the prompts to connect.
- Publish your site after connecting.
The app handles verification automatically. You can view basic GSC metrics inside Webflow’s Apps panel without switching tabs. For most site owners, this is the cleanest option.
Method 2: HTML tag verification (manual)
This method works for any Webflow site and creates a standalone GSC property independent of the Webflow app.
- Go to Google Search Console and sign in.
- Click Add property in the top-left dropdown.
- Choose URL prefix and enter your full live URL:
https://www.yourdomain.com. - Under “Other verification methods,” select HTML tag.
- Copy only the verification ID — the alphanumeric string after
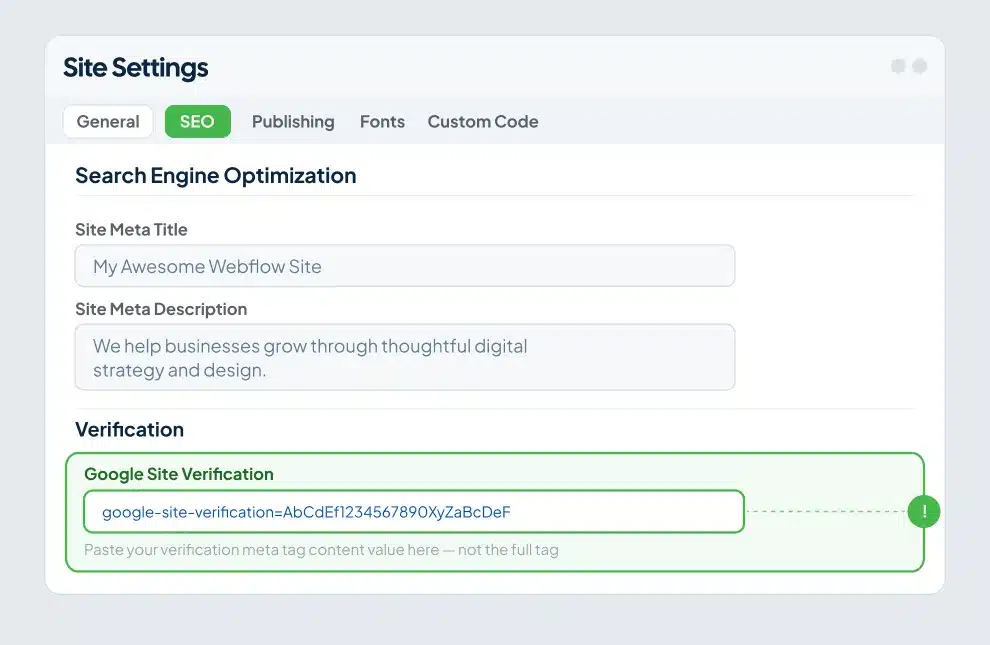
content=, not the full tag. If Google provides<meta name="google-site-verification" content="abc123XYZ" />, you copy onlyabc123XYZ. - In Webflow, go to Site Settings > SEO.
- Paste the ID into the Google Site Verification field and save.
- Publish your site.
- Return to GSC and click Verify.
Step 8 is where most people fail. GSC verifies your live published site, not your Webflow draft. Paste the code, save, publish, then verify. In that order.
Domain property vs. URL prefix: which one to choose
GSC offers two property types and the difference matters more than most guides explain.
URL prefix tracks only the exact URL you enter and its subpages. Verification uses the HTML tag method, which requires no DNS access. For a standard Webflow site on one custom domain, this covers everything you need.
Domain property tracks all subdomains, all protocols (http and https), and both www and non-www versions under a single property. Verification requires adding a DNS TXT record at your domain registrar. If your Webflow site spans multiple subdomains, or you want one unified view across every URL variant, use the Domain property.
For a typical Webflow site on a custom domain, URL prefix is faster and causes fewer problems.
How to submit your Webflow sitemap
Webflow generates your sitemap automatically, but you have to enable the feature first and then submit the correct URL. For a deeper look at how Webflow sitemaps work and how to configure them correctly, see our Webflow sitemap guide.
Enable the sitemap:
- Go to Site Settings > SEO.
- Toggle on Auto-generate sitemap.
- Publish your site.
Once published, open yourdomain.com/sitemap.xml in your browser to confirm it loads correctly before submitting anything to GSC. Also check yourdomain.com/robots.txt to confirm no crawl-blocking directives have crept in.
Submit it:
- In GSC, go to Indexing > Sitemaps in the left sidebar.
- Type
sitemap.xmlin the field (GSC already knows your domain from the property). - Click Submit.
Two rules that trip people up. Submit only your custom domain sitemap, never the .webflow.io staging URL. Use HTTPS. Submitting an http:// sitemap when your live site runs on https:// generates an error and stalls indexing.
Google typically processes a newly submitted sitemap within a few days. You’ll see a “Success” status and a count of discovered URLs once it completes.
The Webflow indexing setting to check before you go live
Webflow automatically applies a noindex tag to your .webflow.io staging domain. That behavior is correct — you want Google crawling your live site, not your staging environment.
The risk is a project-level setting that can accidentally apply the same block to your live site.
In Site Settings > SEO > Indexing, review both the staging indexing toggle and any per-page sitemap indexing settings. The staging toggle should block the .webflow.io domain only. Per-page settings let you exclude specific pages from the sitemap and add noindex tags individually. On Webflow sites reviewed before launch, this area gets misconfigured more often than anywhere else in the settings.
After any change here, publish your site and wait a few minutes before checking your live URL or GSC. Changes only take effect on the published version.
The four GSC reports that move rankings for Webflow sites
Opening GSC and feeling overwhelmed by charts is normal. These four reports are where the actionable signal lives.
Performance report
Go to Search results in the left sidebar. This report shows which queries bring people to your site, how often your pages appear in search results (impressions), and how many people click through (clicks).
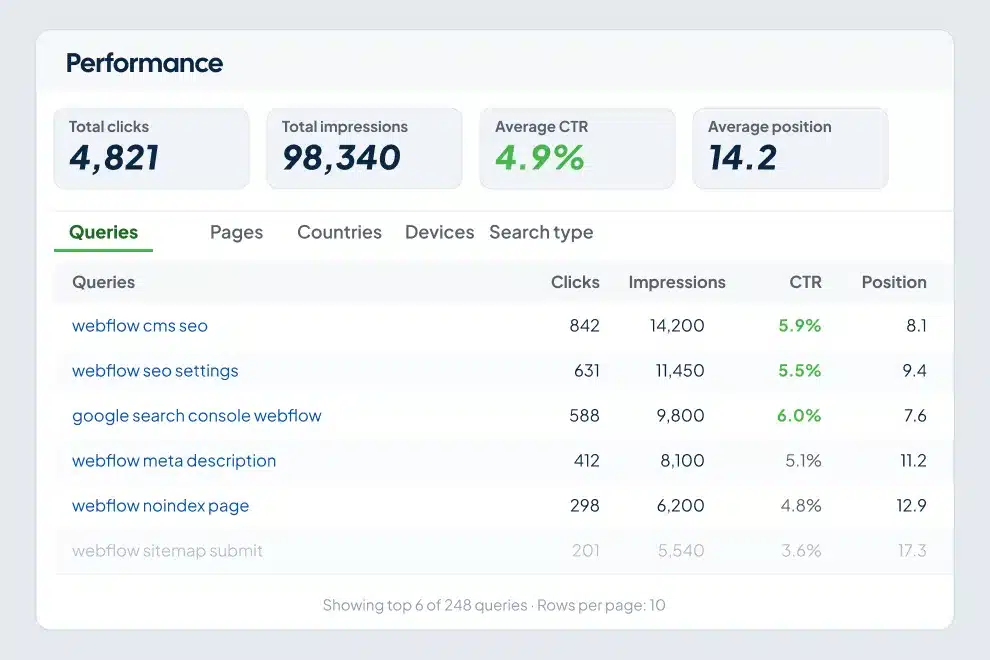
Sort the Queries tab by impressions. Look for pages with high impressions but low click-through rates. These pages show up for searches but aren’t compelling people to click. The fix is in your title tag and meta description — and improving meta descriptions using GSC data is one of the fastest ways to lift CTR without changing the page itself. Open the page in Webflow’s Designer, click the gear icon, and rewrite both to match what the searcher is actually looking for.
Pages ranking between position 8 and 20 deserve the most attention. A focused content improvement or a few internal links can move them from page two to page one. That’s the highest-leverage optimization in GSC.
Pages report
Go to Indexing > Pages. This shows every URL Google processed and what it decided to do with each.
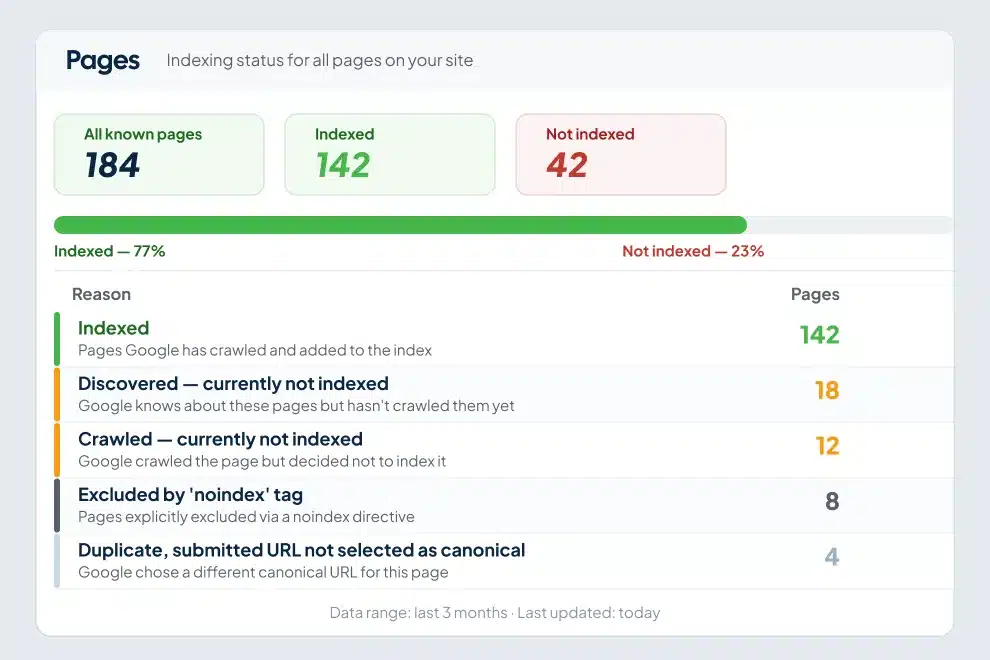
The status you want is Indexed. These statuses require action:
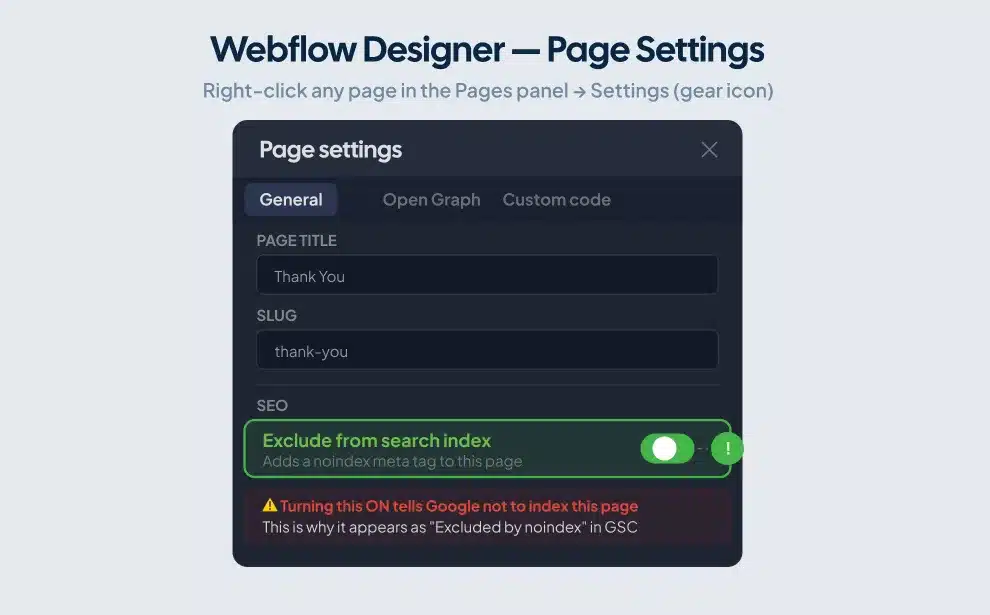
- Discovered, not indexed: Google found the URL but hasn’t crawled it yet. Confirm the page isn’t set to noindex in Webflow’s page settings (Designer > Pages panel > gear icon > SEO tab).
- Crawled, not indexed: Google visited but chose not to include the page. Usually means thin content or near-duplicate content alongside another page on your site.
- Excluded by noindex: Someone added a noindex tag to this page. Check Webflow’s page settings and confirm it’s intentional.
For any page you want indexed that isn’t, open the URL Inspection tool (the search bar at the top of GSC), enter the URL, fix the underlying problem first, then click Request indexing.
Core Web Vitals report
Go to Experience > Core Web Vitals. This shows your performance scores for mobile and desktop, flagging pages that load too slowly or shift during load.
Webflow’s built-in CDN and image optimization handle a solid baseline. The most common failures on Webflow sites are large hero images, autoplay background videos on mobile, and heavy animation sequences that delay the Largest Contentful Paint (LCP). When GSC flags mobile Core Web Vitals issues, start with those assets: check your mobile breakpoint in the Designer, compress large images, and consider whether animations are loading before your primary content.
Links report
Go to Links in the left sidebar. The external links section shows which outside sites link to yours and to which pages. The internal links section shows how Google navigates your site structure.
If a high-priority page shows very few internal links, Google has little reason to prioritize it. Add contextual links to it from related pages, blog posts, or your navigation. Webflow makes this straightforward in the Designer or through CMS page templates.
Webflow-specific mistakes that break GSC
These come from real Webflow forums, real client sites, and real hours lost troubleshooting. Not a theoretical list.
Verifying the .webflow.io staging domain. Submit and verify only your live custom domain. The staging URL is noindexed by Webflow. Verifying it gives you no meaningful data and creates confusion between properties.
Pasting the full meta tag instead of just the ID. When using HTML tag verification, paste only the alphanumeric string after content=. The full <meta> element breaks verification every time.
Forgetting to republish after changing SEO settings. Webflow changes only take effect after you publish. Update your noindex settings, add the verification code, change your sitemap configuration — none of it registers until you hit publish. Then wait a few minutes before testing.
Submitting the sitemap before enabling it. If Auto-generate sitemap is off, yourdomain.com/sitemap.xml returns a 404. Enable it, publish, confirm the URL loads in your browser, then submit to GSC.
404 errors from renamed page slugs. Renaming a Webflow page’s URL slug breaks any existing Google ranking for the old URL. Fix it in Site Settings > Hosting > 301 Redirects: enter the old slug under “Old Path” and the new slug under “Redirect to Path.” This preserves your link equity and clears the 404 from GSC’s Pages report.
Leaving the staging domain indexable. If yoursite.webflow.io is indexable alongside your live domain, Google may index staging pages and split ranking signals between them. Verify your staging indexing settings under Site Settings > SEO > Indexing and confirm the staging domain is blocked.
How long before data appears
After verification, impressions and click data start showing up within 2-4 days. Full query data typically takes 10-14 days to stabilize. The Indexing report updates faster as Google crawls individual pages.
If two weeks pass with no data, check three things: your property shows as verified in GSC, your site is published to the custom domain and not just staging, and no indexing block is active under Site Settings > SEO > Indexing.
The gap between site owners who grow traffic and those who don’t often comes down to this: one group opens GSC and reads it. The other checks that it’s connected and closes the tab.
Here’s a concrete workflow. Open the Performance report every two to three weeks. Sort queries by impressions. Find pages ranking between position 8 and 20 with solid impression volume. Open those pages in Webflow’s Designer. Read the content as if you’re the person who searched for that query. Ask whether it actually answers the question better than the pages above it. Add depth where the content is thin. Rewrite the title tag to match search intent more closely. Build internal links from related pages.
Then use the URL Inspection tool to request re-indexing.
Repeat this for 5-10 pages per cycle. The compounding effect over 90 days is significant. Rankings that move to page one stay there if the content earns them.
For advanced query grouping, GSC supports regex filters in the Performance report. A filter like ^how groups all “how” queries together, revealing content clusters and question-based opportunities you’d miss scrolling through individual queries.
Before diving into GSC, make sure you also have Google Analytics set up on Webflow — the two tools work best together. GSC tells you how people find your pages; Analytics tells you what they do once they arrive. Run both, and you have a complete picture of search performance from first impression through conversion.
To make sure you’re covering every SEO base beyond GSC, work through our Webflow SEO checklist after completing your setup here.
FAQ
Do I need Google Search Console if I already have Google Analytics?
GA4 and GSC measure different things. GA4 tracks behavior after someone lands on your site: pageviews, events, conversions, time on page. GSC tracks how Google finds and ranks your site: search queries, impressions, crawl status, indexing. You need both. GA4 tells you what visitors do after they arrive. GSC tells you how they found you in the first place.
Can I connect Google Search Console and Google Analytics to Webflow simultaneously?
Yes. They run as separate integrations without conflict. Use the native Google Site Tools app or the HTML tag method for GSC. Add your GA4 Measurement ID under Site Settings > Integrations in Webflow. Publish, and both run in parallel.
Why does GSC say my Webflow page is “Discovered – currently not indexed”?
Google found your URL and added it to a crawl queue but hasn’t processed it yet. First, confirm the page isn’t set to noindex in Webflow’s page settings (Designer > Pages panel > gear icon > SEO tab). Then confirm the page appears in your sitemap by checking yourdomain.com/sitemap.xml. If both are fine, use the URL Inspection tool to request indexing. New sites with lower authority often wait two to four weeks before Google prioritizes crawling their pages.
Should I use Domain property or URL prefix in Google Search Console?
URL prefix is the right choice for most Webflow sites. Use the Domain property if your site runs across multiple subdomains or if you want one GSC property covering all URL variants (www, non-www, http, https). Domain verification requires a DNS TXT record at your domain registrar, which adds a step if you don’t have DNS access readily available.
How do I fix a “couldn’t fetch sitemap” error?
Open yourdomain.com/sitemap.xml in your browser. If it returns a 404, go to Site Settings > SEO in Webflow, enable Auto-generate sitemap, and publish. If the URL loads but GSC still errors, confirm you submitted using HTTPS and wait 24-48 hours before resubmitting. Check yourdomain.com/robots.txt as well to make sure no directives are blocking Googlebot from accessing the sitemap. Temporary fetch errors clear on their own more often than not.
How long does it take for Google to index a new Webflow site?
For a new site, expect 1-4 weeks for key pages to appear in Google’s index. Submitting your sitemap and using the URL Inspection tool to request indexing on your homepage and main pages accelerates the process. Sites with strong internal linking, substantive content, and at least a few inbound links from other sites get indexed faster than thin, isolated ones.
Connect it, read it, act on it
Setup is the easy part. The sites that compound organic traffic are the ones whose owners open GSC regularly, find the gap between impressions and rankings, and make specific changes in Webflow to close it.
If you want a team to run that process for you, ClearBrand builds Webflow sites and manages Webflow SEO monitoring and reporting built to compound over time. Schedule a call and we’ll show you exactly where your site stands and what it would take to grow it.