Images are the single biggest reason Webflow sites fail Core Web Vitals. According to the 2025 Web Almanac, images account for the Largest Contentful Paint element on 85% of desktop pages and 76% of mobile pages. Fix your images and your LCP improves. Improve your LCP and your rankings, bounce rate, and conversion rate all move together.
Webflow handles some of this automatically. It generates responsive variants, applies compression on delivery, and adds lazy loading by default. But Webflow’s automatic optimization builds on whatever you upload. Feed it a poorly prepared image and it will serve a slightly less terrible version of that image. The decisions that matter most, including format, compression level, dimensions, alt text, and loading priority, still belong to you.
This guide covers the complete Webflow image optimization process, from what to do before you upload to how to configure each image in the Designer.
Choose the Right Image Format First
Format selection happens before you open Webflow. Upload the wrong format and no amount of in-platform configuration compensates.
WebP is the practical default for photographs, product shots, and editorial imagery. Webflow automatically converts JPEG and PNG uploads to WebP for delivery through the Designer and Asset Manager. Uploading a file that is already WebP before Webflow applies its own compression produces leaner final files than uploading a JPEG and relying on platform conversion alone.
AVIF offers file sizes roughly 50% smaller than JPEG at equivalent visual quality. Browser support reached 94% globally in early 2026, and tooling has matured enough that encoding pipelines like Squoosh and ImageMagick handle it reliably. For most business sites, WebP remains the safer default because the workflow is simpler and the results are well-tested. AVIF makes the most sense on performance-critical pages where squeezing file size further has a direct impact on LCP scores.
SVG for logos, icons, and simple illustrations. An SVG scales at any size, typically stays under 10KB, and can be styled with CSS. Use it whenever the source image is vector-based.
PNG only when you need transparency and the image is too complex for SVG.
GIF deserves a specific callout: Webflow does not auto-optimize GIFs the way it processes JPEG and PNG files. If you need animation, a video element using MP4 or WebM is the best path. It gives you autoplay, loop, and mute controls, compresses far better than any animated image format, and loads through standard browser video optimization. A looping WebP is a reasonable second option if a video element does not fit the implementation.
Compress and Size Images Before Uploading
Webflow applies compression during delivery, but it starts from whatever source file you give it. A 4MB hero image that Webflow compresses to 800KB performs worse than an 800KB hero you prepared yourself, which Webflow then compresses further.
Sizing: Upload images at twice their displayed dimensions. A hero image that displays at 1400px wide on desktop should be uploaded at 2800px. This gives Webflow the pixel density it needs to serve sharp images on retina screens while generating smaller variants for mobile and tablet breakpoints. A 4000px file for a 600px container contributes nothing visible and adds weight the CDN carries on every request.
Target file sizes before upload serve as a useful starting point:
- Hero images: under 200KB
- Featured and blog header images: under 150KB
- Thumbnails and inline images: under 50KB
These are rules of thumb, not hard limits. A full-bleed hero photograph with fine detail may need more room; a simple illustrated graphic may compress far below the target. Run your pages through Google PageSpeed Insights after uploading and let your actual LCP score guide the tradeoffs.
Compression tools: TinyPNG handles JPEG, PNG, and WebP with lossy compression that preserves visual quality well. Squoosh (from Google) lets you compare formats and quality settings side by side before committing. ImageOptim works for batch processing on macOS. For JPEG, quality 80 produces files 60-70% smaller than quality 100 with no visible difference. For WebP, quality 75-85 hits the right balance.
Build the compression habit before every upload. The Webflow CMS does not let you re-optimize images after they sit in a collection field. Fixing a CMS full of uncompressed images later requires either a third-party tool like Optily or re-uploading everything by hand. Neither is fun at scale.
Set Lazy Loading Correctly in Webflow
Lazy loading tells the browser to skip images outside the viewport and load them only as the user scrolls toward them. On image-heavy pages, this cuts initial page load time considerably.
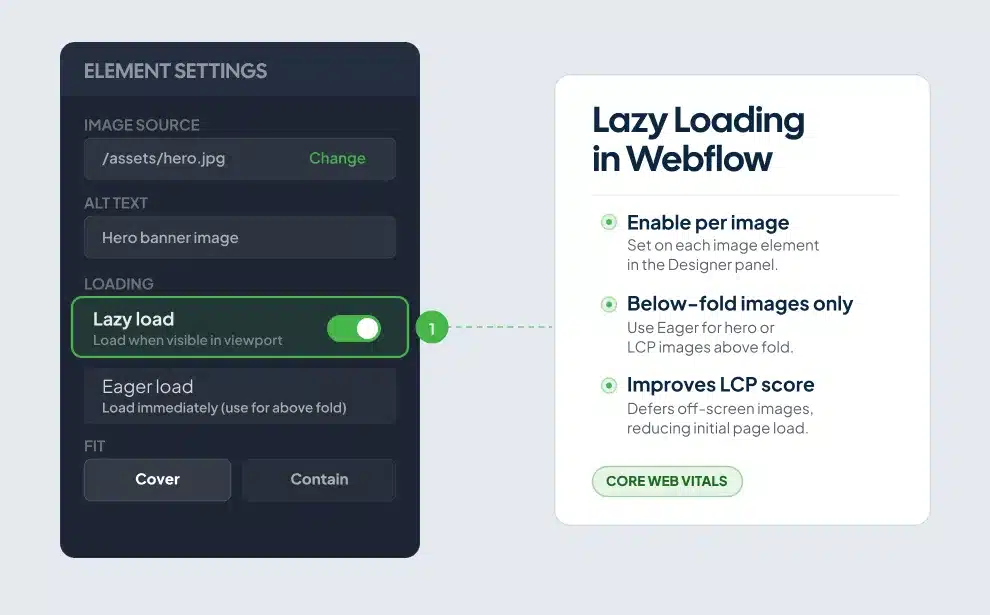
Webflow enables lazy loading by default on new image elements. In the Designer, select any image, open the Element Settings panel (the gear icon on the right toolbar), and toggle the loading behavior between “Lazy” and “Eager.”
The rule: use lazy for every image below the fold, eager for every image visible on page load.
A mistake that appears on roughly 17% of pages, per the 2025 Web Almanac, is lazy-loading the LCP image. The LCP image is your hero, the largest visible element when the page first loads. Lazy-loading it tells the browser to deprioritize exactly the image Google measures for your Core Web Vitals score. Switch every hero image and every above-the-fold image to eager loading.
Background images in Webflow cannot be lazy-loaded. CSS background images bypass the native loading attribute entirely, so the browser downloads them on load regardless of where they appear on the page. If you use a background image for your hero section, it loads eagerly, cannot be converted to WebP automatically, and skips Webflow’s srcset generation. The fix is a regular image element with object-fit: cover applied in the Style panel. It renders identically to a background image, loads faster, and works with responsive image generation and lazy loading. Switching it costs about two minutes per page and is one of the most overlooked performance gains on Webflow builds.
Write Alt Text That Serves SEO and Accessibility
Alt text serves screen readers and search engines at the same time. In Webflow, select any image in the Designer, open the Element Settings panel, and fill in the alt text field. For context on how alt text fits into the broader picture, see the Webflow SEO settings guide.
Effective alt text does three things. Describe what is in the image, specifically. “CFO reviewing Q2 revenue dashboard on a laptop” beats “business photo.” Include your target keyword where it fits naturally, without forcing it. Keep the description under 125 characters.
For decorative images that carry no informational value, leave the alt text field empty in Webflow. This tells screen readers to skip the image rather than announcing a filename or a generic description.
Filenames matter too. Webflow does not rename files on upload. A file called IMG_4892.jpg stays IMG_4892.jpg. Rename files with descriptive, hyphenated names before uploading. webflow-image-optimization-guide.jpg gives Google useful context. photo3.jpg gives it nothing, and it costs you visibility in Google Image Search.
On CMS-driven sites, build alt text into your collection structure. Add a plain text field labeled “Image Alt Text” and bind it to the image element’s alt attribute in the template. Content editors filling collection items get prompted to write alt text instead of leaving it blank. Collections with missing alt text across dozens of items are among the most common accessibility and SEO gaps on Webflow sites. Adding the field once prevents the problem across every future entry.
How Webflow’s Responsive Images and CDN Work
When you upload an image through the Webflow Designer, Webflow generates multiple sized variants using the srcset attribute. A visitor on a 375px mobile screen gets a smaller file than a visitor on a 2560px desktop, with no extra configuration needed.
Webflow delivers these variants through its CDN, routing each image from the server geographically closest to the visitor. For most standard image placements, this automatic responsive handling is sufficient.
The CDN cannot compensate for a poorly prepared source file. Blurry, incorrectly cropped, or over-compressed source images produce blurry, incorrectly cropped, or over-compressed responsive variants. The platform is a multiplier, not a repair tool.
For pages with precise art direction needs, such as a wide landscape crop on desktop and a tighter portrait crop on mobile, use a <picture> element via Webflow’s Embed component. This lets you specify different images for different breakpoints explicitly. Most business sites do not need this level of control, but it is available when the visual design demands it.
CMS Images Need a Different Workflow
Images uploaded through the Webflow Designer and images uploaded through CMS collection fields follow different processing paths. The Designer compresses and converts JPEG and PNG files to WebP consistently. Webflow’s conversion tools now reach many CMS and rich text assets as well, but coverage is not uniform across all field types and use cases. Pre-upload compression gives you full control regardless of how Webflow processes the file on the backend. For a deeper look at structuring collections for performance, the CMS image fields and alt text setup guide covers the full approach.

Compress images before uploading to collection fields. TinyPNG and Squoosh both work for this. Setting size guidelines inside your Webflow CMS field help text is underused and worth the two minutes it takes. Add a note like: “Upload at 1600 x 900px, compressed below 150KB, in JPEG or WebP format.” That text appears next to the field in the CMS editor and trains clients and editors without requiring a separate briefing document.
Optily bulk-optimizes images already stored in CMS collections. At $29.99 for 1,000 image credits, it is practical for sites with large existing image libraries that need retroactive optimization. For new sites, building the compression habit before upload is faster and costs nothing.
Image Optimization and Core Web Vitals
Your Webflow images affect three Core Web Vitals metrics directly. For a broader look at how image performance connects to overall site speed, see the full page speed optimization guide.
LCP (Largest Contentful Paint) measures how long it takes for the main visual element to appear. The target is under 2.5 seconds. Your hero image is the LCP element on most pages. Compress it, upload it at correct dimensions, set it to eager loading, and add a <link rel="preload"> tag in your page head via Webflow’s custom code settings. Preloading the LCP image tells the browser to fetch it before parsing the rest of the page. According to CoreDash, pages with a preloaded LCP image score “good” on LCP 83% of the time, compared to 65% without preloading.
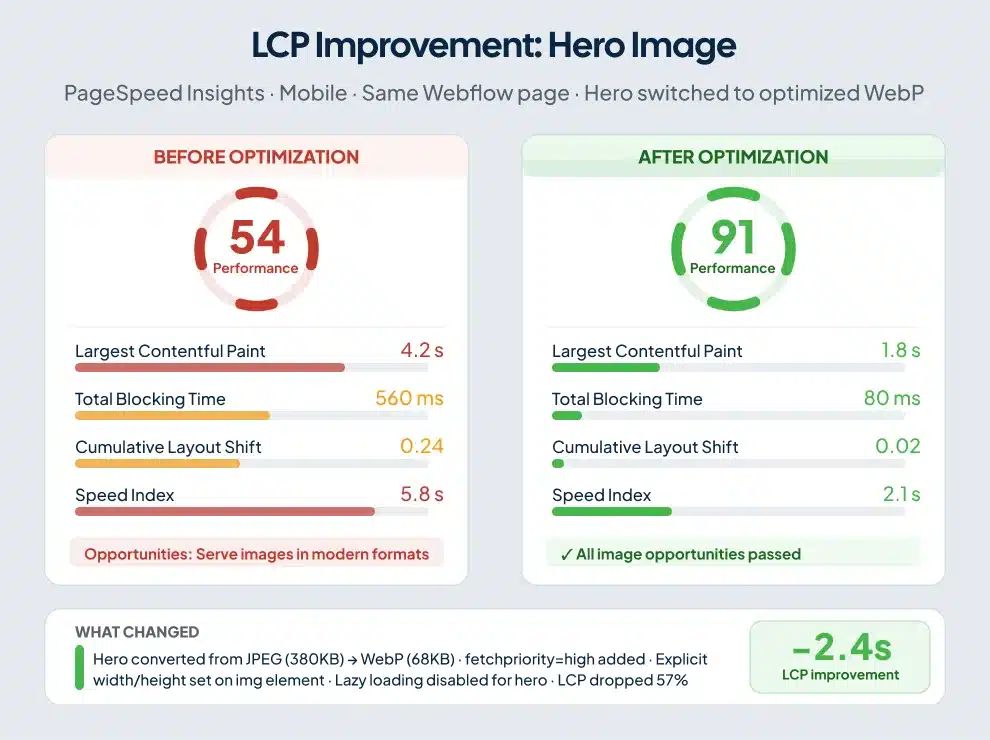
CLS (Cumulative Layout Shift) measures how much page content moves during load. Images without specified dimensions cause layout shifts because the browser reserves no space until the image downloads and dimensions are known. In Webflow, set explicit width and height values on image elements in the Style panel. For responsive images, pair a percentage width with a fixed aspect-ratio in custom CSS. This reserves the correct vertical space before the image arrives.
INP (Interaction to Next Paint) is less directly tied to images, but image-heavy pages with scroll-event listeners or complex Webflow interactions attached to image reveals can drag response times down. Keep image interactions lean.
After making optimization changes, test your pages in Google PageSpeed Insights. Run mobile and desktop versions. The mobile score matters more for organic search because Google indexes mobile-first. Target an LCP under 2.5 seconds and a CLS score under 0.1.
Six Webflow Image Mistakes That Cost Rankings
Uploading at wrong dimensions. A 4000px image for a 1000px container is the most common issue in Webflow audits. The CDN stores and delivers a file four times larger than the display requires on every page load.
Lazy-loading the hero. Webflow’s default lazy loading applies to every image placed in the Designer. Manually switch hero images and all above-the-fold images to eager loading. Leaving the default in place on your hero tells Google to measure a metric you deliberately slowed down.
Using background images for hero sections. They cannot be srcset’d, lazy-loaded, or converted to WebP automatically. Replace them with regular image elements using object-fit: cover. The visual result is identical; the performance difference is measurable.
Skipping alt text on CMS images. Static page images are easy to catch. CMS collection images, particularly those inside rich text fields, get missed regularly. Building the alt text field into the collection structure prevents this at the source.
Uploading uncompressed files. Webflow’s CDN compression helps but cannot fully compensate for a 2MB source file. Compress before uploading, every time.
Leaving generic filenames. A file named shutterstock_1234567890.jpg contributes nothing to Google Image Search visibility. Rename files before uploading. This takes ten seconds per image and compounds across a full site.
Frequently Asked Questions
Does Webflow automatically optimize images?
Webflow automatically compresses and converts JPEG and PNG images to WebP when uploaded through the Designer or Asset Manager. It also generates responsive variants via srcset and delivers them through its CDN. Automatic optimization does not cover filename SEO, alt text, loading priority settings, or all image types inside rich text fields. Those require manual configuration.
What image format should I use in Webflow?
WebP is the best default for photographs and complex imagery. SVG covers logos, icons, and illustrations. PNG handles transparency cases that SVG cannot. AVIF offers smaller file sizes than WebP and tooling has improved in 2026, but WebP remains simpler to implement for most sites. For animation, use a video element (MP4 or WebM) rather than GIF or animated WebP.
Does Webflow lazy load images by default?
Yes. Webflow applies lazy loading by default on image elements added through the Designer. Override this manually for any image visible in the initial viewport. Lazy-loading your LCP image is one of the most common performance mistakes on the web and will hurt your Core Web Vitals score.
How do I add alt text to images in Webflow?
Select the image in the Designer, open the Element Settings panel (the gear icon in the right toolbar), and enter your description in the alt text field. For CMS-driven images, add a plain text field to your collection and bind it to the image element’s alt attribute in the collection template.
What image dimensions should I upload to Webflow?
Upload images at twice the maximum display size to support retina screens. A hero image displaying at 1400px wide should be uploaded at 2800px. Compress before uploading, targeting hero images under 200KB and featured images under 150KB as a starting point, then validate with Google PageSpeed Insights. Webflow generates additional smaller variants from your source file.
How do I fix Webflow image issues affecting Core Web Vitals?
Run Google PageSpeed Insights on your pages to identify which images trigger LCP or CLS issues. For LCP, switch your hero image to eager loading and add a preload link tag in your page head via Webflow’s custom code settings. For CLS, set explicit width and height values on all image elements. Compress all images before uploading, and pay particular attention to anything above the fold.
Start With the Pages That Hurt You Most
A full image audit on a large Webflow site can feel like a lot. Start with your homepage hero and your three highest-traffic landing pages. Run them through PageSpeed Insights. Find the LCP element. Check its loading setting. Measure the dimensions against what the container actually displays on desktop and mobile.
Fix those four pages first. The rest of the site follows the same logic applied systematically. Most Webflow sites pick up 20-40 points in mobile PageSpeed scores from image fixes alone, without touching a line of code.
Image optimization is one layer of a site that ranks. The Webflow SEO checklist covers the technical and on-page elements that work alongside image performance to build compounding organic visibility. If you’d rather have a team handle the audit and implementation, ClearBrand’s Webflow optimization services cover the full stack.