Webflow generates a robots.txt file for your site automatically. The default version is functional enough to launch with, but it gives you almost no crawl control, and the wrong customizations can silently block Google from pages you need indexed, with no error message to tell you something went wrong.
This guide covers how Webflow’s robots.txt editor works, the exact steps to configure it, syntax rules that trip up most setups, how to handle AI crawler traffic in 2026 without disappearing from AI-powered search results, and how to verify the file is live before Google reads it.
What robots.txt Does (and What It Doesn’t)
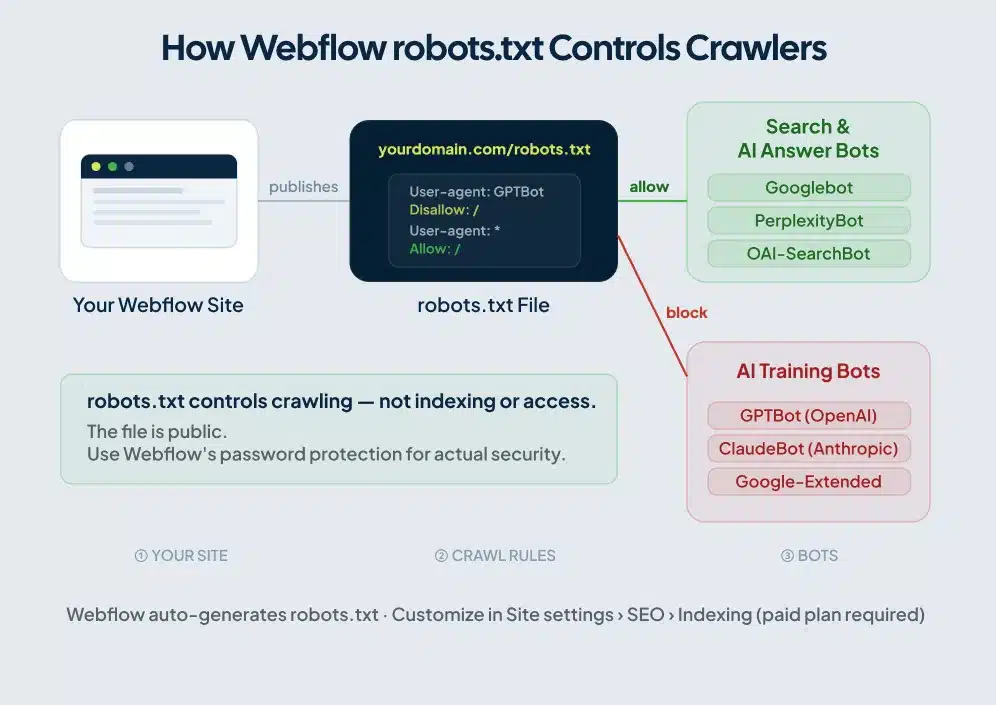
A robots.txt file lives at the root of your domain, at yourdomain.com/robots.txt. Crawlers check it before accessing your site. Googlebot reads it. So does Bingbot, PerplexityBot, and dozens of other bots that hit Webflow sites on any given day.
Two things Webflow site owners consistently get wrong about this file.
robots.txt controls crawling, not indexing. Block a page in robots.txt and Google stops crawling it. But if another site links to that page, Google can still index the URL without ever reading its content. The result is a search result with your URL and no description. To remove a URL from Google’s index completely, you need a noindex meta tag, not a robots.txt rule.
robots.txt is publicly visible. Anyone can visit yourdomain.com/robots.txt and read it. Listing /admin/ or /client-portal/ under Disallow doesn’t hide those paths. It tells scrapers exactly where to find them. Use Webflow’s password protection or member gating for security. robots.txt is a crawl management tool, not an access control layer.
Webflow’s Default robots.txt File
Before you write a single directive, Webflow has already published a robots.txt for your site. The default looks like this:
User-agent: *
Allow: /

Sitemap: https://yourdomain.com/sitemap.xml
All crawlers get access to every page, and the file points them to your sitemap. For a standard Webflow site at launch, this default is reasonable. The sitemap reference helps Googlebot discover your pages faster than it would by following links alone.
One toggle worth noting: in Site settings > SEO > Indexing, you can remove the sitemap line from robots.txt. Leave it in unless you manage sitemap discovery through a separate mechanism. For more on how Webflow handles sitemaps and their relationship to robots.txt, see the Webflow sitemap guide.
Free Plan vs. Paid Plan
Custom robots.txt editing requires a paid Site Plan with a connected custom domain. On the free webflow.io subdomain, specific directives aren’t available.
Your option on the free plan is the “Disable search engine indexing” toggle in Site settings > SEO. Enabling it publishes a separate robots.txt on the webflow.io subdomain that blocks all search crawlers. Use it during development to keep staging content out of Google’s index, and turn it off before launch. This same staging approach applies when you’re moving a site between platforms — for a full walkthrough of how to handle robots.txt during a site move, see the staging site robots.txt during migration guide.
Publishing a site with that toggle on is a fast way to spend your first week live wondering why Googlebot hasn’t visited.
How to Set Up Your Webflow robots.txt
For the most current interface details, refer to Webflow’s official robots.txt help article. The steps below reflect the current setup as of mid-2026.
Step 1. Open your project and go to Site settings.
Step 2. Click the SEO tab and scroll to the Indexing section.
Step 3. Find the robots.txt text field. If you don’t see it, check two things: you need a paid Site Plan, and a custom domain connected. Both are required for the editor to appear.
Step 4. Type your directives using standard robots.txt syntax. Each rule block starts with a User-agent line followed by Disallow or Allow lines. Leave a blank line between separate rule blocks. robots.txt syntax is case-sensitive, so Disallow and disallow are not the same thing, and most parsers expect the capitalized form.
Step 5. Click Save Changes.
Step 6. Publish your site. This is the step most people skip, and it’s where setups break. Webflow serves the last published version of your robots.txt. Saving in settings doesn’t update the live file. Save, then publish.
Step 7. Open a browser and visit yourdomain.com/robots.txt. Your updated directives should appear as plain text. If you still see the old version, the publish didn’t complete.

This robots.txt setup is one piece of the broader full Webflow SEO settings guide, which covers where every technical SEO control lives across your Site settings.
robots.txt Syntax for Webflow Sites
The syntax is short but unforgiving. A misplaced slash, a missing blank line between rule groups, or a lowercase directive can change what Google reads.
Basic structure
User-agent: *
Disallow: /thank-you/
Allow: /
User-agent: * applies the rules below it to all crawlers. Replace the asterisk with a specific crawler name to target only that bot.
Disallow: /thank-you/ tells crawlers to skip that path and anything nested under it.
Allow: / grants access to everything else. Crawlers allow access by default, so this line is optional, but including it makes your intent explicit.
Block a single page
User-agent: *
Disallow: /private-page/
Block all crawlers from the entire site
User-agent: *
Disallow: /
Useful during development. Remove it before you launch. Publishing a site with this rule active stops Google from crawling anything, and recrawling takes time after you correct it.
Target one specific crawler
User-agent: Bingbot
Disallow: /
This blocks Bing’s crawler while leaving Googlebot and everyone else unaffected.
Multiple crawler blocks
Each crawler gets its own block, separated by a blank line. Don’t stack multiple user agents under a single Disallow line, and don’t skip the blank line between blocks. Parsers use that whitespace to determine where one rule group ends and the next begins.
User-agent: Googlebot
Allow: /

User-agent: Bingbot
Disallow: /
Controlling AI Crawlers in Your Webflow robots.txt
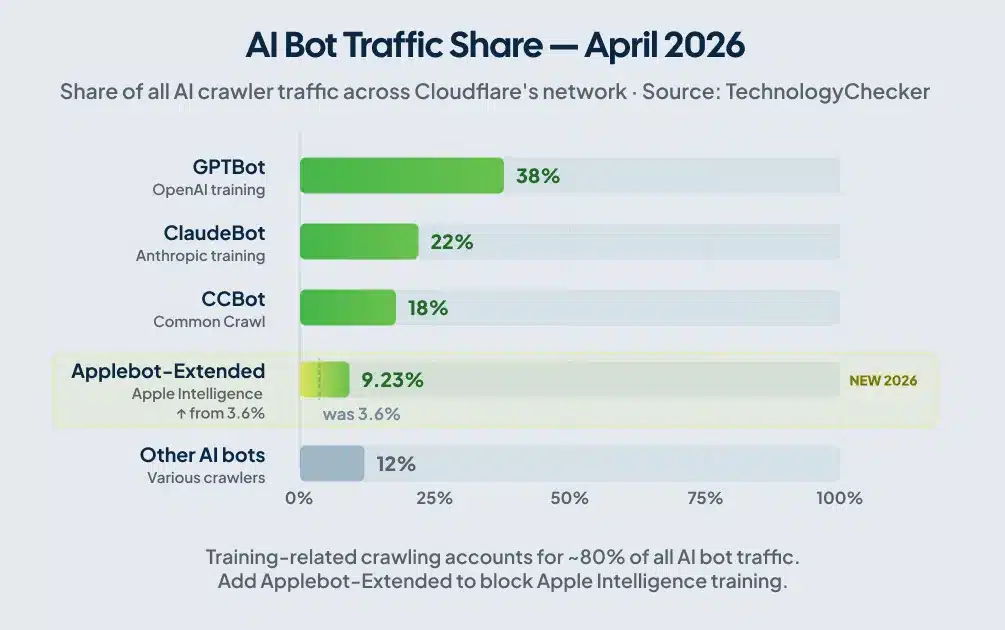
Most guides written before 2025 treat AI bot management as a footnote. It’s moved well past that. As of Q1 2026, training-related crawling accounts for roughly 80% of all AI bot traffic, according to TechnologyChecker’s analysis of robots.txt files across Cloudflare’s network. A study published on arXiv found that AI blocking by reputable sites climbed from 23% in September 2023 to nearly 60% by May 2025.
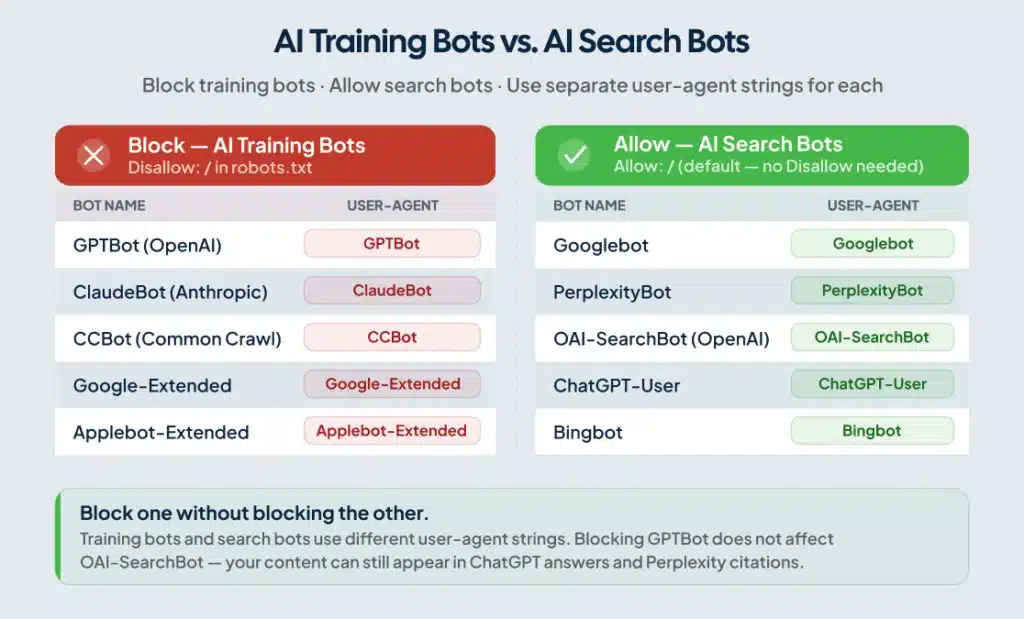
The decision to make before writing any AI bot directives: do you want to block AI companies from training on your content while staying visible in AI-powered search results? For most Webflow sites, the answer is yes to both. The robots.txt syntax gives you that control, because training bots and search bots use different user-agent strings.
Training bots vs. search bots
| Purpose | Bot | User-agent string |
|---|---|---|
| AI model training | GPTBot (OpenAI) | GPTBot |
| AI model training | ClaudeBot (Anthropic) | ClaudeBot |
| AI model training | CCBot (Common Crawl) | CCBot |
| AI model training (Google) | Google-Extended | Google-Extended |
| ChatGPT live web search | OAI-SearchBot | OAI-SearchBot |
| Perplexity AI retrieval | PerplexityBot | PerplexityBot |
| ChatGPT user browsing | ChatGPT-User | ChatGPT-User |
Training bots crawl to collect data for language model training. Search bots crawl to retrieve content for live AI answers and citations. Block the training bots and you protect your content from being absorbed into model training datasets. Block the search bots and you lose visibility in ChatGPT answers, Perplexity citations, and Google’s AI Overviews. Most site owners want the first outcome, not the second.
To block training bots while keeping AI search visibility:
User-agent: GPTBot
Disallow: /

User-agent: ClaudeBot
Disallow: /

User-agent: CCBot
Disallow: /

User-agent: Google-Extended
Disallow: /

User-agent: *
Allow: /
This blocks AI companies from scraping your content for model training while leaving OAI-SearchBot, PerplexityBot, and ChatGPT-User free to crawl for live search answers. You can still appear in Perplexity citations and ChatGPT responses without your content feeding their training pipelines.
The crawler that quietly got bigger in 2026
Applebot, Apple’s crawler for Apple Intelligence features, went from a rounding error to the top five AI crawlers by traffic volume in a single month, jumping from 3.6% to 9.23% of AI crawler traffic between Q1 and April 2026, according to TechnologyChecker’s Cloudflare network data. If your robots.txt was last updated before mid-2025, it probably doesn’t include Applebot-Extended. Add it to block Apple from training on your content:
User-agent: Applebot-Extended
Disallow: /
Note the distinction: Applebot-Extended is a robots.txt token that controls AI training data collection specifically. Standard Applebot handles Apple Search and Siri, which you generally want to allow. Blocking Applebot-Extended doesn’t affect your Apple Search visibility.
Webflow’s built-in AI bot traffic toggles
You don’t have to write every directive manually. Webflow’s Site settings > SEO > Indexing includes Traffic Control toggles that auto-generate robots.txt rules for groups of known AI bots. By default, Webflow allows both search crawlers and AI bots.
The toggles are all-or-nothing. To block training bots while keeping search bots open, write the directives manually. The toggle doesn’t give you that level of control.
Common Mistakes That Break Webflow robots.txt
Saving without republishing
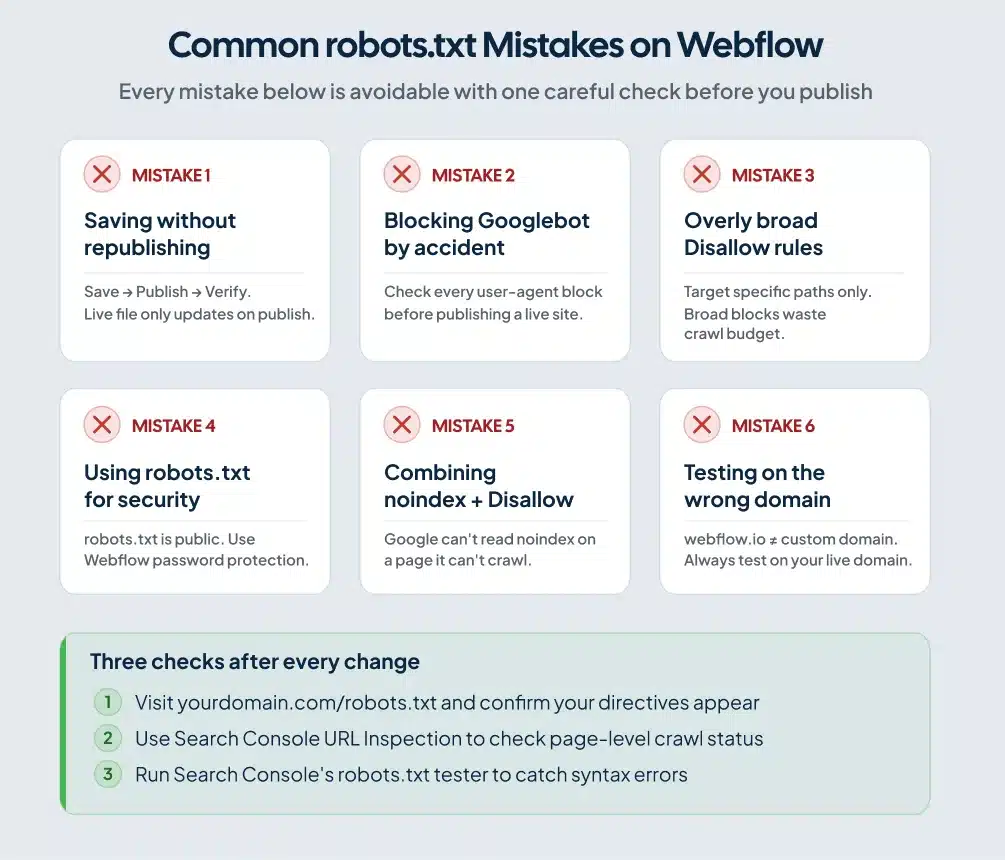
Save your changes in Site settings and nothing in your live robots.txt changes until you publish. After every edit: save, publish, then verify at yourdomain.com/robots.txt.
Accidentally blocking Googlebot
A User-agent: Googlebot block with Disallow: / removes your site from Google Search. This happens most often when someone copies rules from a development environment where all crawlers were blocked, then forgets to update the file before pointing it at the live site. Check your user-agent blocks before every publish.
Overly broad Disallow rules
Blocking large sections of your site with a catch-all Disallow rule can deprive Googlebot of content you actually want indexed. It also signals to Google that many of your pages aren’t worth crawling, which can indirectly compress the crawl budget available to the pages you do want found. Be specific with your blocks. Target the exact paths you need restricted, not entire directories that happen to contain one or two pages you’d rather hide.
Using robots.txt to secure pages
Listing /admin/ or /private-documents/ in your disallow rules tells scrapers exactly where those paths are. robots.txt is public. Webflow’s password protection and member-gating features handle actual security. robots.txt handles crawl management.
The robots.txt and noindex conflict
A page blocked in robots.txt can still appear in Google’s index if Google found it through an external link. A page with a noindex tag that’s also blocked in robots.txt creates a different problem: Google can’t crawl the page to read the noindex instruction, so the noindex never takes effect and the page stays indexed. For pages you need removed from Google’s index, use noindex and keep the page crawlable. Don’t combine the two.
Testing on the wrong domain
Webflow gives you two published URLs: the webflow.io staging subdomain and your custom domain. Each has its own robots.txt. Test on your custom domain. The file at yoursite.webflow.io/robots.txt is separate from yourdomain.com/robots.txt and may have entirely different rules.
A Note on Cloudflare and AI Crawlers on Webflow Sites
Webflow runs on Cloudflare’s infrastructure. Cloudflare’s Bot Fight Mode, enabled by default on all plans including the free tier, blocks automated traffic it classifies as bots. That classification includes legitimate AI crawlers like GPTBot, PerplexityBot, and ClaudeBot.
Your robots.txt might be configured to allow these bots, but Cloudflare can block them at the infrastructure level before they reach your site. Nothing appears in your access logs because the requests never arrive.
For standard Webflow hosting, you can’t access Cloudflare’s Bot Fight Mode settings directly through the Webflow dashboard. Webflow manages that layer. Your primary controls are robots.txt and the Traffic Control toggles in Site settings.
If you’ve layered your own Cloudflare account on top of Webflow’s infrastructure (an orange-to-orange setup), you can create custom firewall rules that allow specific AI crawlers while keeping Bot Fight Mode active for everything else. That requires managing DNS through your own Cloudflare account rather than through Webflow.
How to Test Your Webflow robots.txt
Run three checks after every change.
Direct URL. Visit yourdomain.com/robots.txt in a browser immediately after publishing. Your new directives should appear as plain text. If you see the previous version, republish and check again.
Google Search Console. Go to Settings > Crawl stats to see the robots.txt Google is currently reading for your site. The URL Inspection tool on any specific page shows whether that URL is blocked by robots.txt and includes the rule responsible.
Google’s robots.txt tester. Search Console includes a dedicated tester tool. Paste your file, enter a URL, and simulate Googlebot’s crawl decision against it. The tester catches syntax errors and shows exactly which rule applies to each URL. Run it before and after any changes to your file.
Frequently Asked Questions
Does Webflow create a robots.txt file automatically?
Yes. Webflow auto-generates a basic robots.txt for every published site. The default allows all crawlers and references your sitemap. You can customize it through Site settings > SEO > Indexing on a paid Site Plan with a custom domain connected.
Can I edit robots.txt on Webflow’s free plan?
The custom robots.txt editor requires a paid Site Plan with a connected custom domain. On the free webflow.io subdomain, you can toggle “Disable search engine indexing” to block all crawlers, but you can’t write specific directives or target individual bots.
Will blocking AI bots in robots.txt hurt my Google rankings?
Blocking AI training bots (GPTBot, ClaudeBot, CCBot, Google-Extended) does not affect Google Search rankings. Those rankings depend on Googlebot, a separate crawler with its own user-agent string. Blocking Google-Extended tells Google not to use your content for Gemini training. Googlebot, which drives your search rankings, is unaffected.
Does robots.txt remove a page from Google’s index?
No. robots.txt prevents crawling. Google can still index a URL it discovers through external links, even if that URL is listed under Disallow. To remove a page from Google’s index, add a noindex meta tag and keep the page crawlable. If you block the page in robots.txt while relying on a noindex tag to de-index it, Google can’t read the noindex instruction and the page stays indexed.
Do AI bots actually respect robots.txt?
The major AI crawlers from OpenAI, Anthropic, Google, and Perplexity publish documentation stating they respect robots.txt directives. Smaller and less transparent scrapers may not. For enforcement against non-compliant bots, server-level blocking through a WAF is the more reliable layer on top of robots.txt.
How do I verify my Webflow robots.txt is working?
Visit yourdomain.com/robots.txt after publishing and confirm your directives appear. Then use Google Search Console’s URL Inspection tool to check whether specific pages are blocked. The robots.txt tester in Search Console validates syntax and simulates Googlebot’s crawl decision against any URL you enter.
Conclusion
A well-configured robots.txt protects your crawl budget, keeps development pages out of Google’s index, and gives you real control over which bots access your content. The setup takes less than an hour. The mistakes, forgetting to republish, accidentally blocking Googlebot, confusing crawl blocking with de-indexing, are all avoidable with one careful pass before you publish.
The AI crawler piece deserves deliberate attention now, not later. Training bots and search bots serve different purposes and use different user-agent strings. You can block one without touching the other. Most Webflow site owners who care about appearing in ChatGPT and Perplexity results while protecting their content from training datasets should set up that split configuration, then revisit it a couple of times a year as new crawlers come online.
Before you close this tab, run through the Webflow SEO checklist to make sure robots.txt is the only technical SEO item left to address on your site.
If you want a professional review of your Webflow site’s crawl setup, indexing configuration, and technical SEO foundation, Webflow technical SEO services from ClearBrand include a full audit of what’s holding your organic traffic back.