Every article you publish to your Webflow site is an investment. You are betting time, money, and effort that the page will earn organic traffic over the months ahead. That bet only pays off if Google actually indexes the page.
For a lot of Webflow sites, that indexing is not happening reliably. Pages sit in Google’s “Crawled, currently not indexed” status for weeks. New blog posts take a month to appear in search. Entire CMS collections get crawled but ignored. The content is good, the design is clean, but the technical foundation is working against the SEO program built on top of it.
The sitemap is usually where the problem starts. The good news is that every issue covered in this guide has a direct fix inside Webflow’s settings.
What a Webflow Sitemap Actually Does
Similar to a table of contents, a sitemap contains links to various pages of your site which search engines use to access your site’s content. Search engine crawlers follow the paths provided in the sitemap to index site pages and make them available in search engine results.
Without a sitemap, Google still discovers pages by following links. A sitemap acts as a direct, unambiguous signal about what exists on your site and what you want crawled. If you run a blog with many posts, a sitemap helps Google find every article. For a site with a growing content library, that matters enormously. Pages that are not in the sitemap and have no internal links pointing to them may never be discovered at all.
Webflow’s auto-generated sitemap feature automatically generates a sitemap.xml for your site and updates it each time you publish. For most sites, that means you never have to build or update the file manually. The risk is in the defaults. Webflow’s auto-generated sitemap includes every published page, which often means thank-you pages, test pages, and thin CMS items are included when they should not be.
Managing your sitemap well means making intentional decisions about what goes in and what stays out. The steps below cover both.
Before You Do Anything Else: Check Your Staging Subdomain
Every Webflow site has a staging subdomain in the format yoursite.webflow.io. If this subdomain is being indexed by Google, it is creating duplicate content problems right now, because it is a complete copy of your live site. This is one of the most common Webflow indexing mistakes, and it happens silently because nothing in the interface flags it as a problem.
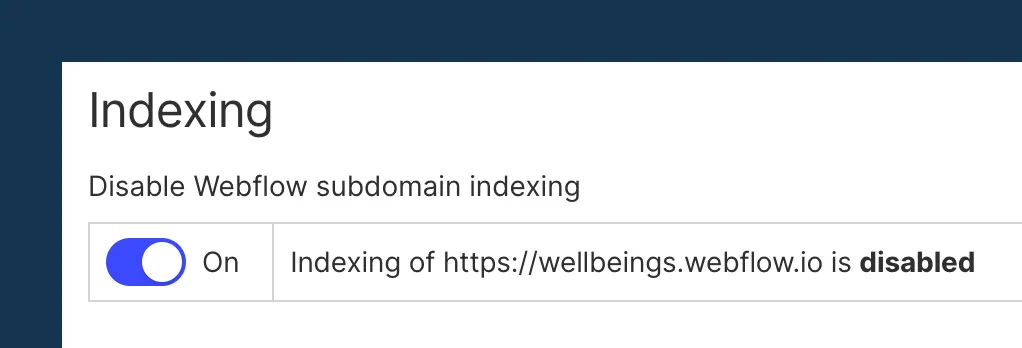
Webflow provides a setting to prevent search engine indexing of your webflow.io subdomain, leaving your custom domain completely unaffected.
To disable staging subdomain indexing, go to Project Settings > SEO, find Disable Webflow subdomain indexing, enable it, and publish the site. If your staging domain was already indexed before you enable this setting, submit a removal request through Google Search Console’s URL Removal Tool.
Check this before working through the steps below, especially if your site has been live for more than a few weeks without this setting enabled.
Step 1: Initial Setup — Sitemap Generation and Domain Configuration
Two settings need to be correct before anything else in this guide will work: your sitemap needs to be generating, and your default domain needs to be set. Both are quick to configure and are often both misconfigured at the same time on sites that have never had a deliberate SEO setup.
Enable auto-sitemap generation
If your sitemap is not appearing at yourdomain.com/sitemap.xml, go to Project Settings > SEO, scroll to Sitemap Settings, confirm Auto-generate sitemap is toggled on, and publish your site.
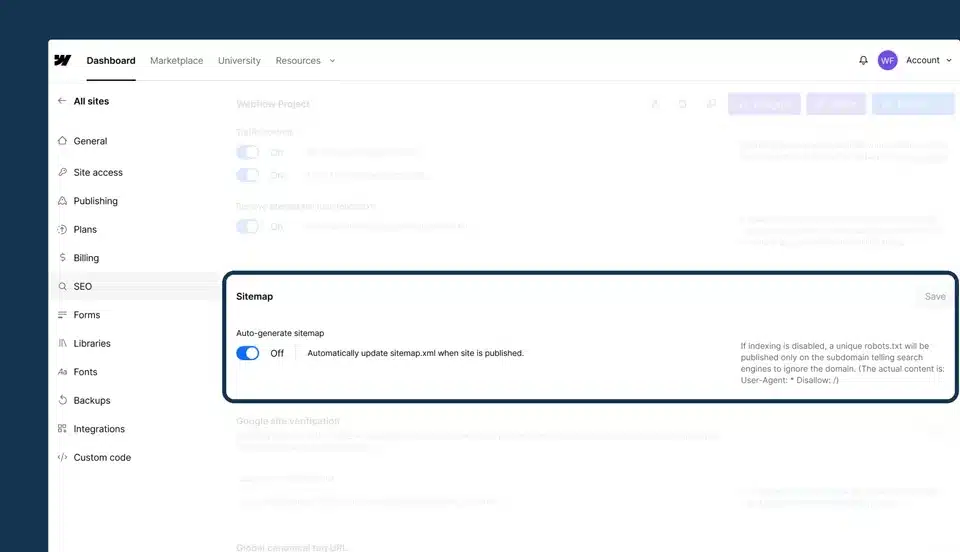
By default, Webflow regenerates the sitemap every time you publish the site. This ensures that any new pages are included and unpublished ones are removed automatically. Make sure your site is published after any changes so the sitemap updates correctly.
Set your default domain
Without a default domain set, Google might crawl both www. and non-www. URLs, diluting authority. Your sitemap may also point to inconsistent URL versions, which sends mixed signals to search engines about which version of each page is canonical.
To fix this, go to Project Settings > Hosting > Custom Domains, mark one domain as default, and republish. Set this before submitting your sitemap to Search Console. If you are already seeing URL inconsistencies in your coverage report, this setting is usually the cause.
With both settings confirmed, you are ready to submit.
Step 2: Submit Your Sitemap to Google Search Console
Webflow generates and hosts your sitemap automatically, but Google does not automatically know it exists. You need to submit it directly.
Google may automatically find and index your website through a link on another site, but verifying ownership, submitting a sitemap, and manually requesting that Google index your site can typically speed up the process.
To submit, open Google Search Console for your property, click Sitemaps in the left menu, enter sitemap.xml in the field, and click Submit. After submission, Search Console will show the sitemap status, the number of URLs submitted, and how many have been indexed.
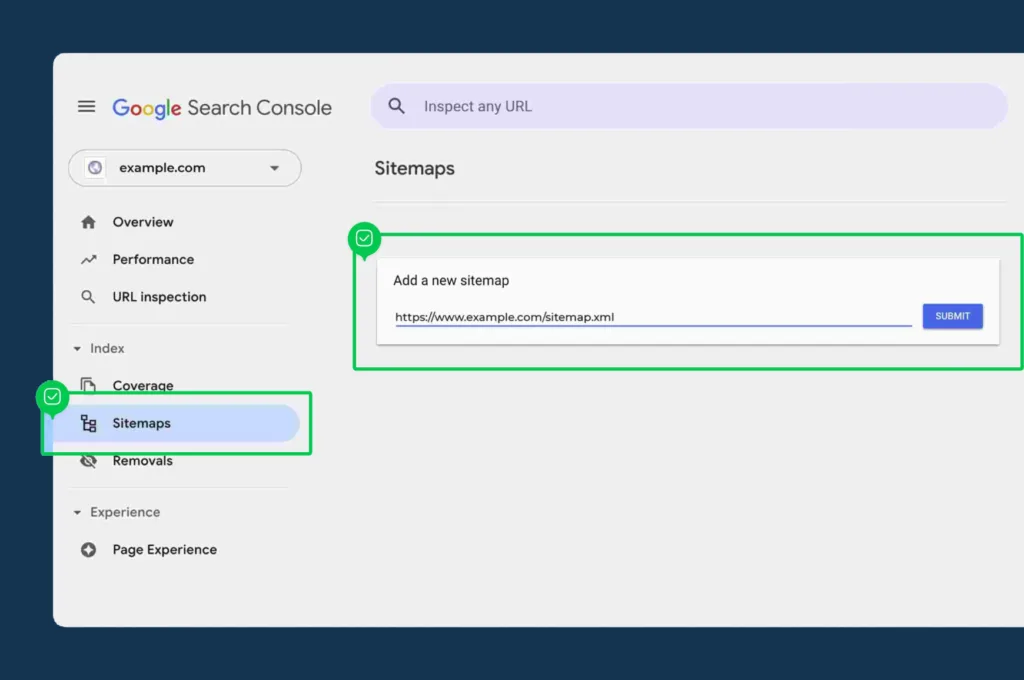
Webflow automatically adds your sitemap.xml address to your site’s robots.txt file. Google’s crawlers can discover your sitemap through robots.txt even before you submit manually, but submitting through Search Console gives you the visibility to monitor indexing progress and catch problems before they compound. Check back after a few days and review the coverage report for any exclusions that need attention.
Step 3: Exclude Pages That Should Not Be Indexed
Before configuring which pages to exclude, understand why this matters. For larger or rapidly growing sites, a bloated sitemap full of low-value URLs can dilute crawl efficiency and direct Google’s attention away from your most important pages. A high volume of low-value pages can also weaken overall site quality signals, which affects how Google evaluates the pages that do matter.
Most sites accumulate pages that should never have been indexed: thank-you pages for every form submission, campaign landing pages created for paid traffic, old test pages that were never deleted, placeholder pages for services still in development. None of these belong in your sitemap.
Pages to exclude:
- Thank-you and form confirmation pages
- Paid campaign landing pages, especially those that duplicate service page content
- Staging, test, or draft pages
- Utility or account pages
- Placeholder pages under construction
- CMS items with thin or incomplete content
Before publishing new pages, ensure slugs are concise, descriptive, and keyword-relevant. Your sitemap reflects these exactly, so a slug like /services-copy-3 signals disorganization to both users and crawlers.
One important clarification before taking action: many people try to use robots.txt to block pages they do not want indexed. This does not reliably prevent indexing on its own. If you’d like to prevent the discovery of a particular page or URL on your site, don’t use the robots.txt to disallow the URL from being crawled. Instead, use the Sitemap indexing toggle to disallow search engines from indexing your content. Robots.txt controls crawling, not indexing. Pages blocked in robots.txt can still appear in search results if they are linked from external sites. The Sitemap indexing toggle is the correct tool.
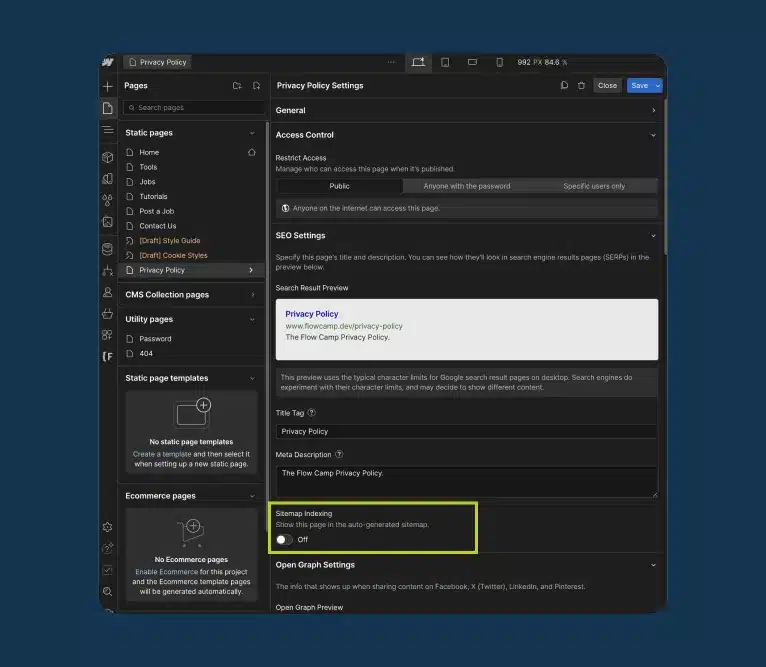
How to exclude a static page:
- In the Designer, open the Pages panel
- Click the gear icon next to the page you want to exclude
- Scroll to SEO Settings
- Toggle Sitemap Indexing to Off
- Publish the site
Disabling sitemap indexing removes the page from sitemap.xml and also applies a noindex directive in most cases, which further prevents it from being indexed. Both signals work together to keep the page out of search results.
Step 4: Manage CMS Collection Indexing
If your site uses CMS collections, there is an additional layer of indexing control that most site owners never configure, and that gap can dilute crawl efficiency on larger sites.
Webflow includes all published CMS items in your sitemap automatically. For a well-structured blog where every post has real content, good internal links, and a unique angle, that is exactly right. The problem is that CMS collections frequently contain items that have no SEO value: team member profile pages that link straight to LinkedIn, portfolio items with no descriptive copy, draft-quality posts published before they were ready.
On growing sites, thin CMS pages can pull crawl attention away from your service pages and high-value articles. The fix is straightforward once you know it exists.
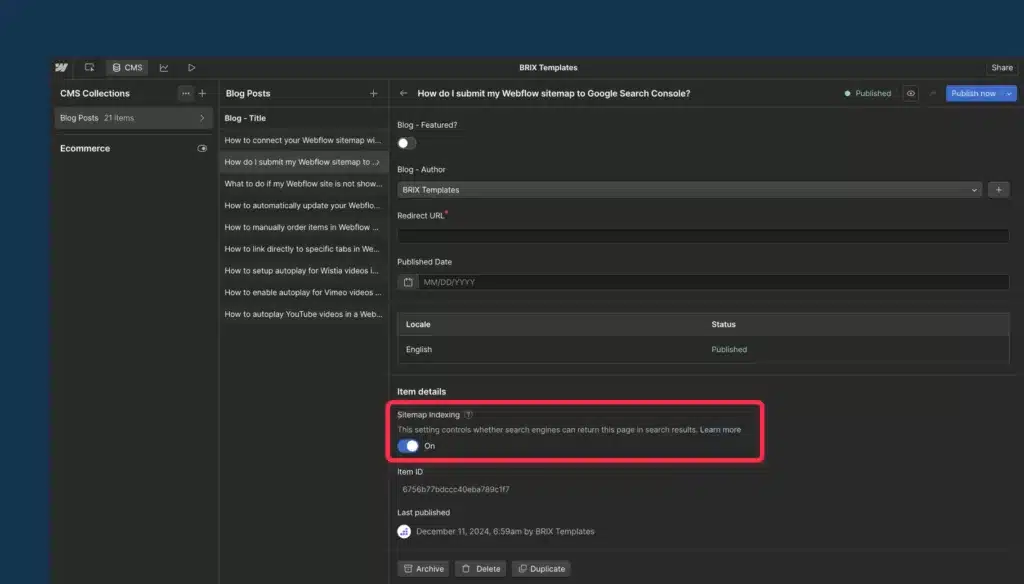
To exclude an individual CMS item from indexing:
- Open the CMS item in the Webflow Designer
- In the item settings, find the Search engine indexing toggle
- Toggle it Off
- Publish the site
When disabled, the CMS item will include a noindex meta tag, instructing search engines not to index it. Note that this feature is only available on paid Site plans.
To exclude an entire CMS collection template from indexing:
Navigate to the Collection Template page settings, go to the Custom Code tab, and add <meta name=”robots” content=”noindex”> in the Head Code section. This custom code affects every page generated from the collection template, meaning all individual CMS item pages will include the noindex meta tag. The collection listing page itself remains indexed unless you separately configure it.
For CMS-driven sites, use collection filters and conditional visibility to ensure only complete, high-quality CMS items make it into the sitemap. Before excluding an entire collection, audit the individual items first. Sometimes the fix is improving the content on specific items rather than removing the collection from indexing entirely.
Step 5: Fix Orphan Pages
Orphan pages are the most misunderstood indexing problem on Webflow sites, and fixing them tends to produce faster indexing gains than almost anything else.
An orphan page is a published page with no internal links pointing to it from other pages on your site. It may be in your sitemap. Google may even crawl it. But pages without internal links are less likely to be indexed or ranked consistently.
Internal links help Google understand priority and context. If a URL is in your sitemap but has zero internal links, Googlebot will find the URL, but it will lack the topical scaffolding provided by your site’s hierarchy. Being in the sitemap tells Google a page exists. Internal links tell Google the page matters. A page needs both.
How orphan pages happen in Webflow:
CMS collection lists with item count limits are the most common source. If your blog listing page shows 12 posts but your collection has 40, the other 28 have no path to them from any linked page. They are in the sitemap but functionally invisible to Google because no other page signals their importance. Other common sources include new service pages not added to navigation, blog posts with no related article links, and test pages published and forgotten.
How to find them:
Run a crawl using an SEO audit tool (our Webflow SEO checklist covers the right tools for this) and filter for pages with zero inbound internal links. Cross-reference against your sitemap. Any URL that appears in the sitemap with no internal links pointing to it is an orphan.
How to fix them:
Add at least one contextual internal link from a relevant, already-indexed page. For important pages, link from multiple locations: a related blog post, the relevant service page, and the site navigation or footer if appropriate. Contextual links in body content carry the strongest signals. Automated widgets like related posts are useful, but they do not replace hand-placed links that carry strong context. A footer link is better than nothing, but an editorial link from a related article on a topic Google already associates with you is what actually moves the needle.
Step 6: Review Your robots.txt
Your robots.txt file controls which pages crawlers can access. Webflow adds your sitemap location to robots.txt automatically, which is helpful. The risk comes when custom rules are added incorrectly and pages you want crawled end up blocked.
The most dangerous mistake is a Disallow: / directive, which blocks all crawling across the entire site. This is sometimes added during development to prevent a staging build from being indexed, and then never removed when the site goes live. If your coverage report in Search Console shows pages excluded by robots.txt, that is where to start the investigation.
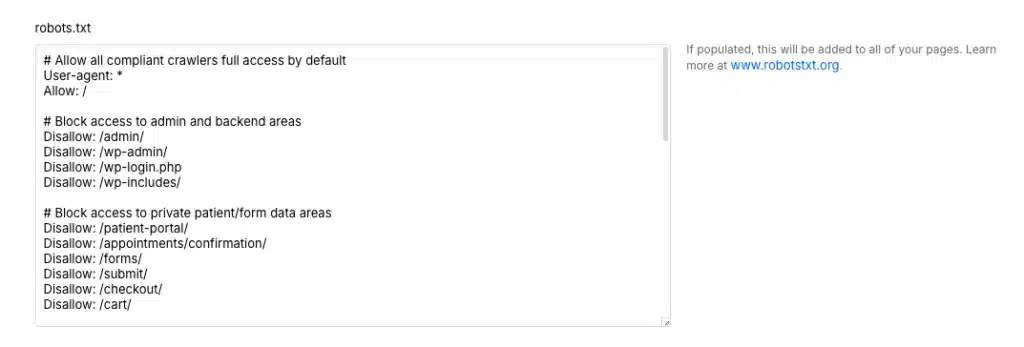
To review your current robots.txt in Webflow, go to Project Settings > SEO and look at the custom rules in the robots.txt field. You can also visit yourdomain.com/robots.txt directly in your browser to see what crawlers are currently reading. Remove any Disallow: / rules that were added for staging purposes, save the change, and republish.
With robots.txt clean and your sitemap submitted, the setup side is complete. The next section covers when to go beyond Webflow’s default sitemap for more complex sites.
Step 7: When to Use a Custom Sitemap
Webflow’s auto-generated sitemap covers the needs of most small to mid-size sites. There are situations where you need more control than it provides, and recognizing those situations early saves a significant amount of remediation work later.
Webflow’s auto-generated sitemap doesn’t support setting page priority or change frequency. A custom sitemap gives you those controls, although search engines place limited weight on these fields today. For multilingual sites, hreflang tags are essential so Google serves the right language or region to the right audience. Webflow Localization can handle hreflang implementation automatically when configured correctly. If you are using a manual localization approach, you will need to manage hreflang tags in a custom sitemap, otherwise you risk Google serving the wrong language version to international visitors.
Large or multilingual sites often use sitemap index files to split content into multiple smaller XML sitemaps. Webflow doesn’t do this automatically, so you’d have to manage that manually if your site exceeds the sitemap size limit.
Cases where a custom sitemap is worth the additional maintenance:
- Sites approaching or exceeding 50,000 URLs
- Multilingual sites requiring precise hreflang management outside of Webflow Localization
- Sites using a reverse proxy to combine multiple Webflow projects under one domain
- Situations requiring granular control over which campaign URLs are included or excluded
To switch to a custom sitemap, go to Project Settings > SEO, toggle Auto-generate sitemap to Off, paste your custom XML in the text field that appears, and publish the site. This gives you full control to manually add hreflang information, lastmod attributes, or page priority properties. You will also need to update this information manually whenever you change anything on your website. For most sites, that ongoing maintenance cost is not worth it. For the cases listed above, it is.
Troubleshooting: Why Your Pages Are Not Getting Indexed

If pages are in your sitemap but not appearing in Google, work through this list in order. The issues are arranged from most common to least.
The page has no internal links. This is the most frequent cause of indexing failures on Webflow sites. A page in your sitemap with no internal links will be found by Google but is less likely to be prioritized for indexing. Add at least one contextual internal link from a relevant, already-indexed page, then use the URL Inspection tool in Search Console to request indexing for high-priority pages when needed.
The page is published to the staging domain, not the live domain. Confirm all pages are published to the correct domain, not just the Webflow staging domain. Publishing a page draft in the Designer is not the same as publishing the full site to your live domain.
The page has a noindex tag applied. Check the page settings in the Designer. If the Sitemap Indexing toggle was accidentally disabled, re-enable it and republish. Also check whether any custom code in the page head contains a <meta name=”robots” content=”noindex”> tag left over from development.
The content is thin or duplicates another page. If a page shows “Discovered – currently not indexed,” it means Google found it but hasn’t deemed it index-worthy yet, often due to low content quality or duplication. Thin pages need more substantive content. Duplicate pages need either a canonical tag pointing to the preferred version, or a noindex tag if the duplicate has no SEO purpose. If you have changed any page slugs or restructured the site recently, make sure 301 redirects in Webflow are in place so old URLs pass their equity to the new destinations rather than returning 404 errors.
Robots.txt is blocking the page. Review your robots.txt rules in Project Settings > SEO and look for Disallow directives covering your key pages. Any page excluded by robots.txt will show that status explicitly in Search Console’s coverage report.
The sitemap has not been updated after recent changes. If you restructured the site, added new pages, or changed slugs recently, republish the site to trigger a fresh sitemap, then resubmit in Search Console. For high-priority pages, use URL Inspection and Request Indexing when needed. Don’t spam it. Use it for high-value pages.
Is Your Webflow Site Getting the Indexing It Deserves?
If your pages are not getting indexed despite having a clean sitemap, the underlying cause is almost always findable. A technical audit will show you exactly which pages are being excluded, why Google is deprioritizing them, and what needs to change.
At ClearBrand, our Webflow SEO services include a full technical audit covering sitemap structure, coverage status, internal linking gaps, canonical conflicts, and crawl budget allocation. You will leave knowing exactly what is suppressing your rankings and have a clear plan to fix it.
Book a free Webflow SEO audit. If your pages are in the sitemap but not getting indexed, we will show you exactly why.
Sitemap Quick Reference Checklist
Use this as your reference after reading each section above.
- Auto-generate sitemap is enabled in Project Settings > SEO
- Default domain is set in Project Settings > Hosting > Custom Domains
- Webflow staging subdomain indexing is disabled
- Sitemap is submitted to Google Search Console
- Thank-you pages, campaign pages, and utility pages are excluded via Sitemap Indexing toggle
- Robots.txt has no accidental Disallow: / rules
- CMS items are published, indexable, and have substantive content
- No orphan pages: every indexed page has at least one contextual internal link
- Sitemap was republished after the most recent structural changes
- For multilingual or large sites: custom sitemap with hreflang is in place
Frequently Asked Questions
How do I find my Webflow sitemap?
Once your site is hosted and published with sitemap generation enabled, your sitemap is at yourdomain.com/sitemap.xml. If nothing appears there, go to Project Settings > SEO and confirm the auto-generate sitemap toggle is on, then republish.
Does Webflow automatically submit my sitemap to Google?
No. Webflow generates and hosts your sitemap, but submitting it to Google Search Console is a manual step. Go to the Sitemaps section in Search Console, enter sitemap.xml, and click Submit. Submission gives you visibility into indexing status and surfaces errors you would otherwise miss.
What pages should I exclude from my Webflow sitemap?
Exclude any page that does not serve a legitimate SEO purpose: thank-you pages, paid campaign landing pages that duplicate service page content, test or staging pages, utility pages, and CMS items with thin or incomplete content. A clean, intentional sitemap is the backbone of a scalable SEO strategy. Every URL you include signals to Google that you consider it worth ranking.
What is the maximum number of URLs a Webflow sitemap can contain?
The standard XML sitemap limit is 50,000 URLs per file. Most Webflow sites never approach this. If your site does, you will need a sitemap index file pointing to multiple smaller XML sitemaps, which requires switching to a custom sitemap rather than using Webflow’s auto-generated version.
Why is my Webflow page in the sitemap but not indexed?
The most common causes are no internal links pointing to the page, thin or duplicate content, publication to the staging subdomain rather than the live domain, or an accidental noindex tag. Check your Google Search Console coverage report for the exact status of each page, and use URL Inspection to see what Google last saw when it crawled it.
Does submitting my sitemap make new blog posts index faster?
Submitting your sitemap helps Google discover new pages, but it does not guarantee fast indexing. Internal linking and page quality are the bigger factors. A page with no internal links pointing to it is less likely to be consistently indexed or ranked, regardless of sitemap status. For new posts, add internal links from related published articles and use URL Inspection in Search Console to request indexing for your most important pages when needed.
Should I use a custom sitemap or Webflow’s auto-generated one?
For most sites, Webflow’s auto-generated sitemap is sufficient. A custom sitemap becomes necessary for multilingual sites requiring precise hreflang management, sites approaching the 50,000 URL limit, or complex multi-project setups using a reverse proxy. See Step 7 above for the full breakdown.
How do I fix a page that shows “Crawled, currently not indexed” in Search Console?
This status means Google found the page but decided not to index it. The most common reasons are thin content, duplicate content, or no internal links. Improve the content depth, add contextual internal links from relevant indexed pages, ensure the page has a unique title tag and meta description, and request indexing again through URL Inspection. If the status persists after several weeks, the content itself likely needs strengthening. Our complete guide to Webflow SEO settings covers canonical tags, noindex rules, and the other controls that determine what Google does with each page.