You published your first ten blog posts. You waited a few weeks. You opened Google Search Console and found half your pages weren’t indexed, the ones that were had auto-generated title tags, and your meta descriptions were blank or duplicated across every post.
This is a problem. What’s going on here?
Webflow gives you strong SEO controls, but they don’t configure themselves. And because SEO in Webflow operates at three distinct levels, skipping any one of them creates problems the others can’t fix. Most teams skip at least one. Some skip all three and wonder why their content isn’t ranking six months later.
This tutorial walks you through every level in the right order, so your CMS is built to rank before you publish a single piece of content. If you want a broader view of how all the pieces fit together, our complete guide to Webflow SEO covers the full platform from technical foundations to advanced strategy.
How Webflow SEO Works: The Three-Layer Model
Before touching any settings, understand this: Webflow SEO is not one thing. It’s three layers that build on each other. Skipping or misconfiguring any layer creates gaps that show up in Google months later, often after you’ve published dozens of pages that now need cleanup.
Layer 1: Project Settings. Sitewide defaults. Controls your global title format, fallback meta description, XML sitemap, preferred domain, and robots.txt. Everything else inherits from here.
Layer 2: Page Settings. Individual static pages get their own title tags, meta descriptions, URL slugs, and Open Graph data. Changes here override project defaults for that page only.
Layer 3: Collection Template Settings. The most powerful and most overlooked layer. When you configure SEO at the collection template level, every item in that collection (every blog post, case study, service page) automatically inherits a properly formatted title tag and meta description. You set the formula once. Every future piece of content benefits from it.
The right sequence is Layer 1, then Layer 2, then Layer 3. This tutorial follows that order. Don’t skip ahead.
Phase 1: Build the Foundation
These are the sitewide settings that every page on your site inherits. Get these right before you touch anything else.
Step 1: Configure Project-Level SEO Settings
(Updated: corrected UI paths to reflect current Webflow Site settings)
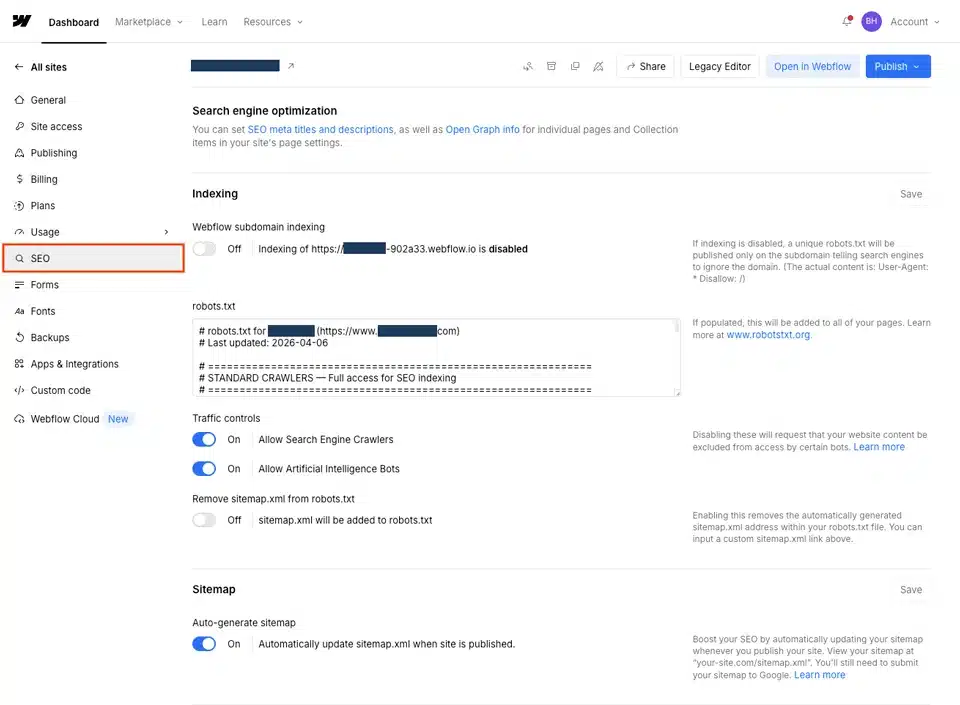
Open the Webflow Designer and navigate to Site settings > SEO. This is where Webflow’s sitewide SEO controls live, including your global title format, sitemap settings, and indexing controls.
Set your global title format
Webflow lets you define a sitewide title template. The format field looks something like [Page Name] | [Site Name]. This applies to any page without a custom title tag set at the page level, so it’s a fallback, not a primary strategy.
Keep the full rendered output under 60 characters. A format like [Page Name] | YourBrand is clean and easy to scan in search results. The pipe separator is standard.
Pro tip: This template only applies to pages without custom titles. Pages with manually set title tags, including CMS collection items with dynamic titles, override it automatically.
Set a global fallback meta description
Write one sentence describing what your site does and who it’s for. This only displays on pages without their own description. Treat it as a safety net.
Enable the XML sitemap
Webflow auto-generates an XML sitemap so search engines and AI systems can easily find and crawl your pages. Once your site is live, it’s accessible at yourdomain.com/sitemap.xml. You’ll submit this to Google Search Console in Phase 4. For a deeper look at how to manage your sitemap after launch, including how to troubleshoot indexing issues, see our guide on managing your Webflow sitemap for better indexing.
Set a single preferred domain
Go to Site settings > Publishing > Production and confirm you’re running on one canonical domain (either www or non-www, not both). Running both versions without a redirect creates duplicate content at the domain level and dilutes your ranking signals before a visitor even lands on a page.
Step 2: Optimize Your Static Pages
With the project foundation in place, work through your key static pages before touching any CMS collections.
How to access page SEO settings
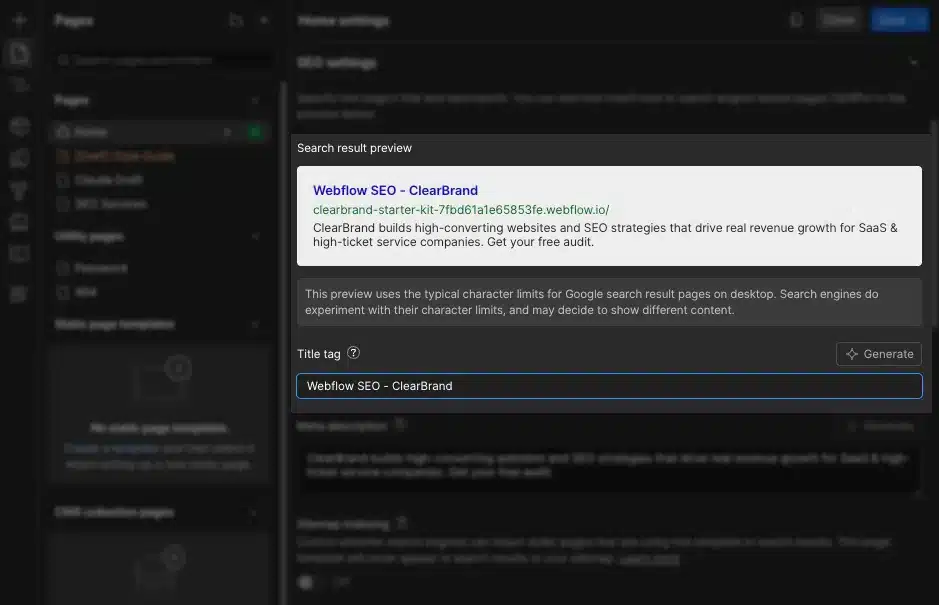
In the Designer, open the Pages panel (page icon in the left sidebar). Hover over any page and click the gear icon. SEO fields are in the middle of the settings panel.
Write unique title tags
Every page that should rank needs its own title tag written for that specific page and keyword. The title should clearly reflect the page topic, while the meta description should summarize the content concisely. Duplicate titles and vague descriptions should be avoided.
Useful formulas to start with:
- Homepage: Primary Keyword | Brand Name
- Service pages: Service Name for [Niche or Location] | Brand Name
- About page: About Brand Name | One-line descriptor
Stay under 60 characters. Google truncates longer titles, and the truncation rarely lands somewhere useful.
Write meta descriptions as invitations, not summaries
Meta descriptions don’t directly affect rankings, but they directly affect whether someone clicks. Write them as ad copy for the page: 140 to 160 characters, primary keyword included naturally, and a clear answer to the question “what do I get if I click this?” For detailed guidance on writing descriptions that earn clicks, including before-and-after examples and a quick-reference checklist, see our post on how to write meta descriptions in Webflow.
Clean up URL slugs
Webflow auto-generates slugs from your page name. Edit the slug field directly in Page Settings. A slug like /search-engine-optimization-services-for-small-business-owners loses to /seo-services in both readability and ranking signal concentration.
Rules to follow: use hyphens between words (not underscores), keep slugs short and keyword-focused, cut stop words unless needed for clarity, and never use capital letters or special characters.
Confirm heading hierarchy
A single H1 should define the main topic, followed by properly structured H2 and H3 subheadings. Click each heading in the Designer and confirm its tag type in the Typography panel. Every page should have exactly one H1. Multiple H1s create ambiguity about what the page is primarily about.
Phase 2: Set Up Your CMS Collections

This is where most teams lose months of compounding SEO progress without realizing it. Get this right before you publish a single CMS item.
Step 3: Structure Your Collections Before You Publish Anything
The mistake almost every team makes is building a blog collection, starting to publish, and then trying to optimize later. By that point, the URL structure is locked in on indexed pages, the metadata is inconsistent across dozens of items, and fixing it properly requires 301 redirects and republishing.
What teams end up with is a collection of optimized pages that don’t form a coherent entity architecture. Individual pages might look clean, but Google sees disconnected content with no topical structure.
Design collections around search intent
Each CMS Collection should serve a distinct content type with a specific audience intent. Don’t combine unrelated content in one collection to simplify your CMS. The short-term convenience creates long-term SEO problems.
Common collection types and their primary purposes:
- Blog Posts: informational content targeting long-tail keywords
- Services: commercial intent pages, often niche or location-specific
- Case Studies: bottom-of-funnel, trust-building content
- FAQs: question-based queries, strong for AI answer engine visibility
Add SEO-specific fields to every collection
In the CMS panel, open your collection and add these fields before publishing anything:
- SEO Title (plain text)
- Meta Description (plain text)
- Featured Image (image field, used for Open Graph)
- Excerpt (plain text or short multi-line text)
- Image Alt Text (plain text)
Note: Use plain text fields for SEO metadata because they are the right field type for short, unformatted values like title tags and meta descriptions. (Updated: softened the explanation per accuracy review)
Set your collection URL prefix deliberately
When you create a collection, you set its URL path, for example /blog or /services. This prefix is prepended to every item’s slug. Set it correctly before publishing.
One important limitation to plan around: Webflow CMS does not support nested slug segments inside Collection item slugs. If you type “/” in a slug field, Webflow converts it to “-“. Plan your URL hierarchy at the collection level using folders, not within individual item slugs.
Pro tip: If you ever need to change a collection URL prefix after pages are indexed, you’ll need to create 301 redirects for every affected page. Get it right the first time.
Phase 3: Configure Your Collection Templates
This is the highest-leverage phase. The work you do here applies automatically to every piece of content you’ll ever publish in this collection.
Step 4: Set Up Dynamic Metadata
Done correctly, this step means you never manually write a title tag for an individual blog post again. You set the formula once. Every item that gets published inherits it automatically.
How to access collection template page settings
In the Pages panel, scroll to CMS Collection Pages. Hover over your collection template and click the gear icon.
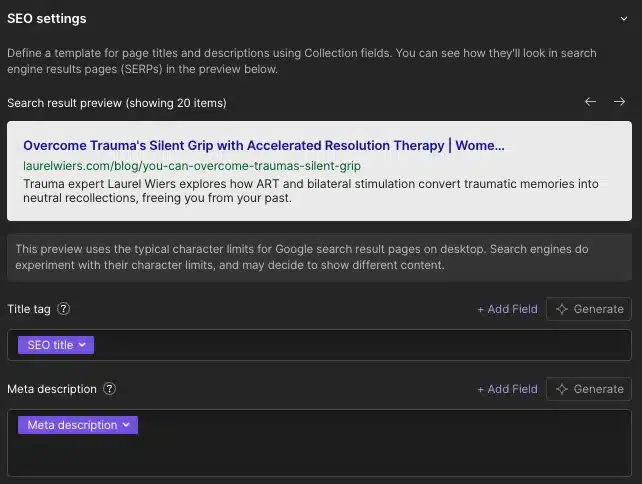
Build a dynamic title tag formula
In the SEO section, click the Title field. You’ll see a small Add Field button marked with a purple icon. This inserts a dynamic value pulled from your collection fields.
For a blog post collection, build the title like this:
- Click Add Field and select your SEO Title field
- Type | YourBrandName as static text after the dynamic field
The result renders as: How to Set Up SEO in Webflow CMS | ClearBrand
Set it once, and every item gets a properly formatted title. To prevent blank titles when the SEO Title field is empty, add the Name field as a second fallback. Webflow uses the first populated value in the chain.
Build a dynamic meta description formula
In the Description field, click Add Field and select your Meta Description field. Add your Excerpt field as a fallback. This ensures every item has a unique, controlled description rather than Google pulling a random snippet from the page body.
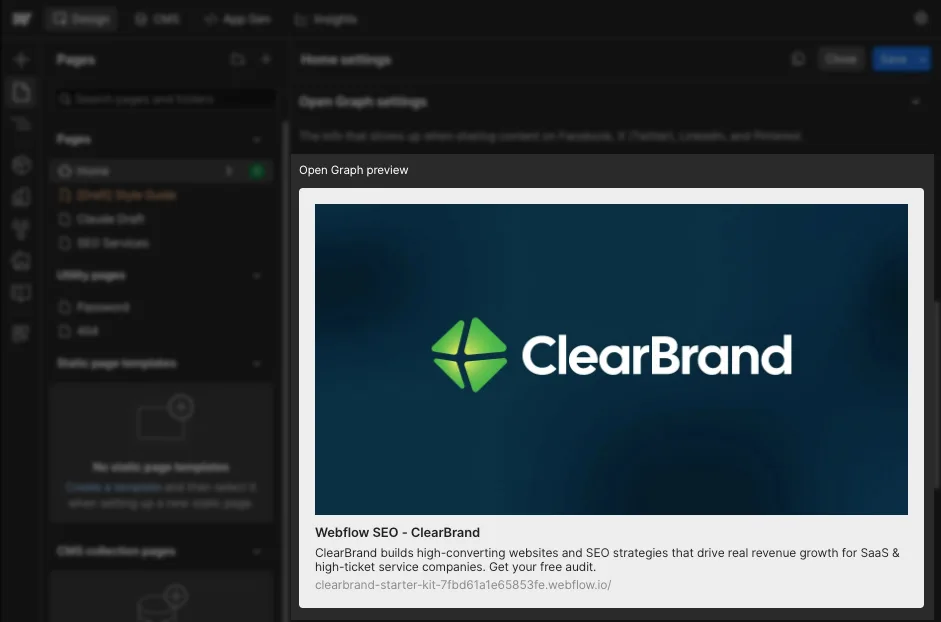
Step 5: Configure Open Graph for Social Sharing
Open Graph tags control how your pages appear when shared on LinkedIn, X, and other platforms. They also influence how AI tools preview and cite your content.
Bind the OG title and description
In the same template settings, open the Open Graph section. Bind the OG title field to your SEO Title field using Add Field. For CMS Collection pages, bind the OG title field to your CMS collection field.
For the OG description, binding it to the same Meta Description field works fine for most teams. If you want to separate them, add a dedicated OG Description field to your collection.
Pro tip: Your meta description might be information-dense and keyword-conscious. Your OG description can be more emotionally resonant and action-oriented because the context is social sharing, not search results. If you’re publishing content that gets shared frequently, the distinction is worth the extra field.
Set a dynamic OG image
Bind the OG image to your Featured Image field. OG images require specific dimensions: 1200x630px is the optimal Facebook/LinkedIn size. For collection templates, populate it with purpose-built social images and don’t just reuse article header images.
Sharing a page without a properly sized OG image results in a blank or randomly pulled visual. Every social share your content earns performs worse than it should. A five-minute fix per post prevents this permanently.
Step 6: Build the Template Structure for On-Page SEO
This step covers heading hierarchy and image alt text inside your collection template. Both are configured once in the Designer and apply to every item published.
Set the H1 element
The heading structure you configure in your collection template applies to every item in that collection.
- In the Designer, open your collection template page
- Add a Heading element where your post title should appear
- Change its tag to H1 in the Element Settings panel
- Click the element, then click Connect to a field (the purple icon)
- Select your Name or Title field from the dropdown
Every subheading within the article body should be H2 or H3. Writers set heading levels directly in Webflow’s rich text editor. Add this to your editorial guidelines so the structure stays consistent without requiring Designer access.
Handle image alt text at the template level
This is one of the most consistently skipped steps in Webflow CMS SEO setups.
The Audit Panel does not check alt text for CMS-bound images, so take care to ensure you’ve included alt text for any images you’ve connected to the CMS.
When you bind your template’s image element to the Featured Image field, also bind the alt text attribute to your Image Alt Text plain text field. This gives writers a designated place to add descriptive alt text in the CMS editor without needing to open the Designer.
Note: You don’t need to include phrases like “image of” or “picture of” as screen readers already announce the presence of an image. A reliable format for blog posts: [Post topic] — [what the image shows].
Step 7: Add Schema Markup to Your Collection Templates
Schema markup tells search engines and AI answer engines what type of content is on each page. For a blog, the most valuable type is Article. For Q&A content, it’s FAQPage. Both can increase your visibility in rich results and AI-powered search significantly.
Schema markup requires custom code (JSON-LD) because Webflow does not offer a visual interface to configure it. But you only set it up once per collection template, and every item inherits it automatically. For a full walkthrough of every schema type that matters for Webflow sites, including ready-to-use JSON-LD code for each one, see our guide on Webflow schema markup and structured data.
How to add dynamic Article schema
- Open your collection template in the Designer
- Go to Page Settings > Custom Code > Head Code
- Paste your JSON-LD structure into the editor
- Where you need dynamic values, click the Add Field button (the purple icon in the code editor)
- Select the relevant CMS field from the dropdown
Build the HTML structure in the custom code area and use the Add Field button to pull CMS values into the code. Here is the Article schema to start with. Replace the BIND: comments by placing your cursor at that position and using Add Field:
<script type="application/ld+json">

{
  "@context": "https://schema.org",
  "@type": "Article",
  "headline": "BIND: SEO Title field",
  "datePublished": "BIND: Published Date field",
  "dateModified": "BIND: Updated Date field",
  "author": {

    "@type": "Organization",
    "name": "Your Company Name",
    "url": "https://yoursite.com"

  },

  "image": "BIND: Featured Image URL field",
  "description": "BIND: Meta Description field"
}
>
Note: After publishing, validate your schema using Google’s Rich Results Test. Webflow HTML-encodes content from plain text fields for security, which works correctly for most JSON-LD values, but it’s worth confirming before assuming everything rendered as expected.
Adding FAQPage schema for AI answer engines
If your blog posts include a FAQ section, FAQPage schema helps AI systems like ChatGPT and Google’s AI Overviews pull your answers directly. Add a Multi-line Text field called FAQ Schema to your collection. Writers paste a pre-formatted JSON-LD block into this field for each post. In the collection template, add an HTML Embed element (not a text element) and bind it to this field.
This keeps every post’s FAQ schema unique without requiring Designer access after the initial setup.
Step 8: Build Internal Links Through Reference Fields
Internal linking is one of the highest-leverage SEO activities on a CMS-heavy site. Done manually, it’s tedious and inconsistent. Done through Webflow’s reference fields, it’s nearly automatic.
Reference fields in Webflow CMS allow you to connect related content automatically, creating internal linking opportunities that benefit both user experience and SEO. For example, link related blog posts or connect service pages to relevant case studies.
How to set this up
- Add a Multi-Reference field called Related Articles to your Blog Posts collection, referencing the same collection
- In the Designer, add a Collection List element to the bottom of your collection template
- Set the source to your Related Articles reference field
- Design a simple linked card bound to each referenced item’s name, excerpt, and slug
Writers assign two or three related articles in the CMS editor when publishing new content. It takes under a minute and builds a compounding internal link architecture over time. Every new post you publish creates additional link opportunities across the site.
Pro tip: Connect service pages to relevant case studies using the same approach. A reference field on your Services collection pointing to Case Studies creates bottom-of-funnel internal links on every service page automatically.
Phase 4: Launch Preparation
Before you go live or publish a new batch of content, these three steps protect the work you’ve done in Phases 1 through 3.
Step 9: Control What Gets Indexed
(Updated: corrected control name and workflow to reflect current Webflow documentation)
Not every page in your CMS should be indexed by Google. Thin content, accidentally published drafts, and utility pages with no search value can all dilute your crawl budget and drag down overall domain quality.
Over time, a site full of low-quality indexed pages is harder to rank than one where Google only sees pages worth ranking.
- Exclude a specific collection item. Open the item in the CMS editor and go to its details. Find the Sitemap Indexing toggle and turn it off. When disabled, Webflow adds a noindex tag to that page and removes it from the sitemap.
- Exclude an entire collection. Open the collection template’s Page Settings in the Designer. Under the SEO tab, toggle the indexing control off for the full template. Every item in the collection inherits the setting.
Use these controls for: draft or incomplete posts that went live early, tag or category pages with thin content, and internal utility pages not intended for organic traffic.
Note: Excluding a page from search doesn’t delete it. The page still exists and is accessible by direct URL. It just won’t appear in Google’s index or sitemap.
Step 10: Run the Webflow Audit Panel
(Updated: qualified the alt text claim to reflect that the Audit Panel does not check CMS-bound images)
Before you publish, run a pass through Webflow’s built-in audit tools. In the Designer, click the Audit icon in the left sidebar. This panel surfaces:
- Missing or duplicate title tags
- Missing meta descriptions
- Alt text issues on static images (note: the Audit Panel does not check alt text for CMS-bound images, so those need to be reviewed manually as described in Step 6)
- Broken links
- Heading hierarchy errors
Fix every flagged issue before publishing. These are five-minute corrections that, left unaddressed, compound into ongoing ranking problems. Don’t publish over them.
Step 11: Submit Your Sitemap to Google Search Console
Once your site is published and the SEO setup is complete, connect it to Google Search Console.
- Go to search.google.com/search-console
- Add your property and verify ownership (Webflow supports HTML tag or DNS verification)
- In the left sidebar, click Sitemaps
- Enter sitemap.xml and click Submit
This submission informs Google that there is content to crawl and index, which reduces the delay between publication and appearance in search results.
Check back within two to three weeks of launch. If pages aren’t indexing as expected, the Page indexing report will tell you exactly why. For a deeper look at troubleshooting sitemap and indexing issues specific to Webflow, our guide on managing your Webflow sitemap walks through the most common causes and fixes. (Updated: corrected “Coverage report” to “Page indexing report” to reflect current Google Search Console terminology)
Pro tip: Search Console is your ground truth for how Google actually sees your site. Without it, you’re guessing whether pages are indexing, whether there are crawl errors, and whether your SEO setup is doing what you think it’s doing. Connect it the day you launch.
Publishing Checklist
Use this before every launch and every batch of new CMS content.
Collection setup (one-time, before first publish)
- SEO Title field added (plain text)
- Meta Description field added (plain text)
- Featured Image field added
- Image Alt Text field added (plain text)
- Excerpt field added (plain text)
- Related Articles reference field added
- Collection URL prefix set correctly
Collection template settings (one-time per collection)
- Dynamic title tag bound to SEO Title field, with Name as fallback
- Dynamic meta description bound to Meta Description field, with Excerpt as fallback
- OG title bound to SEO Title field
- OG image bound to Featured Image field
- H1 element bound to post Name/Title field
- Article schema added to head custom code with dynamic field bindings
- Image alt text attribute bound to Image Alt Text field
- Indexing confirmed as enabled
Per-item publishing (every piece of content)
- SEO title written (under 60 characters, primary keyword included)
- Meta description written (140 to 160 characters, primary keyword included)
- Featured image uploaded at 1200x630px
- Image alt text field filled in
- Slug is short, clean, and keyword-focused
- Related articles assigned via reference field
- Heading hierarchy correct in rich text body (one H1, no duplicates)
- Audit panel shows no errors on static elements; CMS-bound images reviewed manually
Common Mistakes and What They Actually Cost You

- Relying on the global title format as your SEO strategy. The project-level title template is a fallback, not a strategy. When every page title starts with the same brand suffix and nothing unique, Google sees a flat, undifferentiated site. Pages compete with each other instead of targeting distinct keywords. The cost is diffused ranking potential across your entire domain.
- Using the wrong field type for meta descriptions. Plain text fields are the right choice for SEO metadata because they are designed for short, unformatted values. Title tags and meta descriptions don’t need formatting. Use the right tool for the job. (Updated: softened explanation per accuracy review).
- Publishing before the collection template is configured. Once pages are indexed, changing your URL structure requires 301 redirects across every affected page. Missing those redirects means 404 errors, lost link equity, and ranking drops on pages that had started to gain traction. Spend 30 minutes configuring the template before publishing. It saves hours of cleanup later.
- Skipping the OG image. Sharing a page without a properly sized OG image means social shares show a blank or randomly pulled visual. In practical terms, this reduces click-through rates on every LinkedIn post, X share, and Slack link your content ever generates. A five-minute fix per post prevents this permanently.
- Not connecting Google Search Console on launch day. Without Search Console, you won’t know which pages indexed, which returned errors, and which were excluded by your own settings. You’ll find out something went wrong when traffic doesn’t show up, weeks after the fact. Connect it on launch day and check it weekly.
What a Properly Configured Webflow CMS Produces Over 12 Months
Here’s what changes when this setup is done right before you start publishing.
Every new post lands with a unique, keyword-optimized title tag and meta description already formatted from the template. Your schema markup is in place the moment content goes live, telling Google and AI answer engines exactly what type of content each page contains. Your internal link structure grows automatically as writers assign related articles. Your sitemap updates itself. Your crawl budget goes toward pages that deserve to rank.
After six months of consistent publishing, you’ll have a content library where every piece is technically clean, contextually linked, and discoverable through both traditional search and AI-powered engines. After twelve months, the compounding effect becomes visible in your Search Console data: more indexed pages, broader keyword coverage, stronger topical authority signals, and a measurable reduction in the gap between publishing a new post and seeing it rank.
That’s the difference between a Webflow site that looks good and one that actually works. A properly configured CMS doesn’t just make SEO easier to manage. It makes every piece of content you publish more likely to reach the people it was written for.
If you want help building or auditing the SEO foundation on your Webflow site, ClearBrand’s Webflow SEO services are built specifically for this, for owner-led companies who want organic growth that compounds over time.
Frequently Asked Questions
How do I set up SEO in Webflow CMS?
Setting up SEO in Webflow CMS requires working through three layers in order: project settings, static page settings, and collection template settings. Start with your global title format, sitemap, and canonical domain in Site settings. Then write unique title tags and meta descriptions for your static pages. Finally, configure your collection templates with dynamic metadata fields so every item automatically inherits properly formatted SEO settings when published.
What is the best way to set up dynamic meta titles and descriptions in Webflow CMS?
Add dedicated plain text fields for SEO Title and Meta Description to your CMS collection. Open your collection template’s Page Settings, click into the title or description field, and use the Add Field button to bind those fields dynamically. Set it once, and every item gets a properly formatted title. Use a fallback chain (SEO Title field first, then Name field) to ensure no item publishes with a blank title tag. For detailed guidance on writing descriptions that convert, see our post on how to write meta descriptions in Webflow.
Does Webflow automatically generate an XML sitemap for CMS pages?
Yes. Webflow auto-generates an XML sitemap so search engines and AI systems can easily find and crawl your pages. It updates automatically when you publish new content. Access it at yourdomain.com/sitemap.xml and submit it to Google Search Console to speed up indexing for new and existing pages.
How do I add schema markup to Webflow CMS collection pages?
Open your collection template’s Page Settings, go to the Custom Code tab, and paste your JSON-LD into the Head Code section. Build the HTML structure in the custom code area and use the Add Field button to pull CMS values into the code. This produces unique schema for every collection item from a single template. For complete JSON-LD code for every schema type relevant to Webflow sites, see our guide on Webflow schema markup.
What is the difference between static page SEO settings and CMS collection template settings in Webflow?
Static page settings require manual entry of a title tag and meta description for each individual page. Collection page settings can have dynamic values, meaning they result in unique information for each Collection item page. Configuring SEO at the collection template level means you set a formula once and every item published in that collection inherits it automatically, with no manual work per post.
How do I stop certain Webflow CMS pages from being indexed by Google?
Open the individual item in the CMS editor and go to its details. Find the Sitemap Indexing toggle and turn it off. When disabled, Webflow adds a noindex tag to that page and removes it from the sitemap. To exclude an entire collection, open the collection template’s Page Settings in the Designer and toggle the indexing control off at the template level. The pages still exist and are accessible by direct URL. They simply won’t appear in Google’s index or sitemap.
Is Webflow good for Answer Engine Optimization (AEO) as well as traditional SEO?
Yes. Webflow supports effective AEO through structured content capabilities and semantic markup controls that help AI systems understand and surface your content. Adding FAQ schema to collection templates, structuring content with clear heading hierarchies, writing concise paragraph-length answers to common questions, and using descriptive alt text throughout all contribute to visibility in AI-powered search. At ClearBrand, we treat SEO and AEO as a unified system, not separate tracks, because the ranking signals that help traditional search engines understand your content are the same ones that help AI answer engines surface it. You can learn more about how we approach both in our Webflow SEO services.